Getting your tumbler wrap template size wrong before you print is one of the most frustrating mistakes in sublimation crafting. Too narrow and your design leaves a gap. Too tall and it rides up over the rim. This free tumbler wrap template size guide gives you verified flat wrap dimensions for the most popular tumbler brands — with a live generator that outputs a print-ready SVG or PNG template in seconds.
Select your tumbler, adjust your bleed and overlap, toggle your guides on or off, and download. No sign-up, no software, no guesswork.
⚠ Important: Always Check Your Dimensions Before You Print
Always verify dimensions on a test print before printing your final design.
Tumbler dimensions vary between manufacturers, production batches, and even individual blanks. The sizes in this tool are verified from real templates but your specific blank may differ slightly. Sublimation ink and paper are too expensive to waste on a mis-sized wrap.
- Print a test template first on plain paper at 100% scale and wrap it around your tumbler before committing to sublimation paper.
- Measure your actual blank with a tape measure — circumference at the widest point for width, usable body height for height.
- Use the “Your Own Dimensions” section at the bottom of the sidebar if your tumbler differs from the presets.
- Different batches of the same tumbler can have slightly different dimensions — always re-verify if you change supplier.
Free Tumbler Wrap Template Size Guide — Generator
Use the tumbler wrap template size guide generator below — select your tumbler from the list, adjust your bleed and overlap settings, and download your template. All dimensions are verified flat wrap sizes in inches.
How to Use the Tumbler Wrap Template Generator
Step 1 — Select Your Tumbler
Click your tumbler brand and size from the list on the left. The template preview updates instantly. If your tumbler isn’t in the list, use the Your Own Dimensions section at the bottom of the sidebar — enter a name, width, and height in inches and it will be added to the list automatically.
Step 2 — Adjust Your Settings
Three settings affect your template dimensions:
- Bleed — extra space added around the outside of the template. Default is ⅛” (0.125″). This ensures your design reaches the full edge of the wrap even with slight placement variation. Increase to ¼” for tumblers you find harder to apply accurately.
- Overlap — the amount the wrap overlaps itself at the seam. Default is ¼” (0.25″). This is shown as the green zone on the right edge of the template — keep design elements out of this area.
- Safe margin — the inset from the bleed edge to the red safe area rectangle. Default is ¼”. Keep all important design elements inside this boundary.
Step 3 — Toggle Your Guides
Six guide layers can be toggled on or off individually:
- Safe design area — the red rectangle. Keep all design elements inside this.
- Centre lines — blue dashed crosshairs for aligning text and focal elements.
- Overlap zone — green shaded area on the right showing the seam overlap.
- Rule of thirds — amber dashed grid for visual composition balance.
- Bleed zone — red dashed outer border showing the full print area.
- Dimension labels — off by default. Toggle on to show measurements on the template.
Step 4 — Download Your Template
- Download SVG Template — a vector SVG file at 300 DPI with named guide layers. Open in Illustrator, Inkscape, or Affinity Designer and design directly on top of the template layer. The SVG dimensions are set in inches so it imports at the correct physical size.
- Download PNG Guide — a flat raster image at 300 DPI. Use as a reference guide or as a background layer in Canva or Photoshop.
Step 5 — Test Print Before Sublimating
Always print your template on plain paper at 100% scale first. Wrap it around your tumbler and check that the width reaches all the way around with your chosen overlap, and that the height sits correctly between the rim seat and the base ring. Only once you’re happy with the fit should you print on sublimation paper.
Tumbler Wrap Template Size Guide — Verified Reference Table
All dimensions below are verified flat wrap sizes in inches. These are the base template sizes — your downloaded template will be slightly larger due to the bleed margin you set in the generator.
| Tumbler | Width | Height | Notes |
|---|---|---|---|
| 20oz Skinny Tumbler | 9.313″ | 8.210″ | Standard 20oz skinny wrap |
| 30oz Skinny Tumbler | 10.045″ | 9.383″ | Standard 30oz skinny wrap |
| 20oz Hobby Lobby Tumbler | 9.693″ | 8.477″ | Hobby Lobby 20oz skinny |
| 19oz Michaels Tumbler | 11.783″ | 6.967″ | Fan-shaped blank |
| Maars Tumbler | 8.923″ | 7.523″ | Maars brand tumbler |
| Built 20oz Tumbler | 10.047″ | 7.407″ | Built brand 20oz |
| Strata 16oz Tumbler | 8.033″ | 6.733″ | Strata brand 16oz |
| Strata 22oz Tumbler | 11.453″ | 7.503″ | Strata brand 22oz |
| Strata 24oz Tumbler | 11.403″ | 6.703″ | Strata brand 24oz |
| Yeti 20oz Tumbler | 11.027″ | 7.077″ | Yeti Rambler 20oz full wrap |
| Yeti 30oz — Wide Band | 12.683″ | 4.103″ | Yeti 30oz wide band wrap |
| Yeti 30oz — Medium Band | 10.303″ | 2.903″ | Yeti 30oz medium band wrap |
| Yeti 30oz — Skinny Band | 9.203″ | 1.053″ | Yeti 30oz skinny band wrap |
⚠ Always verify these dimensions against your specific blank before printing on sublimation paper. Batch variations between manufacturers mean your tumbler may differ slightly from the figures above.
How to Find Your Tumbler Wrap Template Size
If your tumbler isn’t in the tumbler wrap template size guide list, or if you want to verify the dimensions before printing, here is how to measure your own flat wrap size accurately using a tape measure.
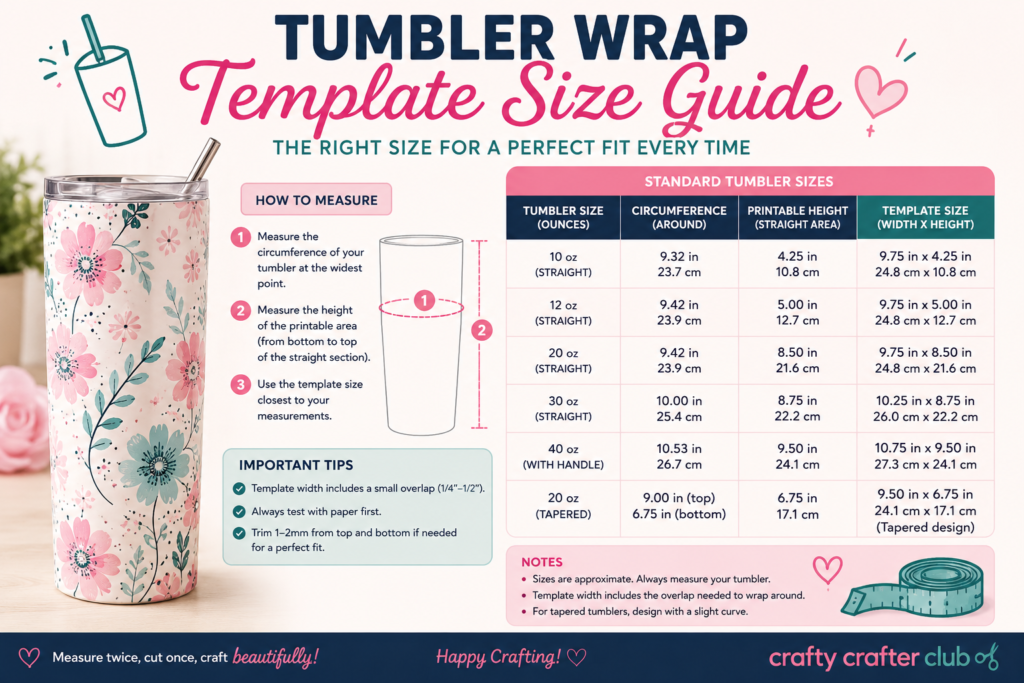
Measuring Width (Circumference)
The width of your wrap template equals the circumference of your tumbler at its widest point. Wrap a flexible tape measure around the widest part of the tumbler body — usually just below the lid seat on most skinny tumblers. For reference, measuring circumference accurately is straightforward with a soft tape measure. Note the measurement in inches. This is your base wrap width. Add your overlap amount (typically ¼”) to get the total template width.
Measuring Height
The height of your tumbler wrap template size is the usable body height — from the top of the base ring to the bottom of the lid seat. Do not measure the full overall height of the tumbler. Place your tape measure just above where the base flares out at the bottom, and measure up to just below where the lid or rim begins. This is your usable wrap height.
Enter Your Measurements
Once you have measured your tumbler wrap template size in inches, scroll to the Your Own Dimensions section at the bottom of the sidebar in the generator above. Enter a name for your tumbler, your width, and your height, then click Add to List. Your custom tumbler will appear in the selector immediately and the template will generate at your exact dimensions.
Tips for Using Your Tumbler Wrap Template
- Always test print on plain paper first. Cut it out, wrap it around the tumbler, and check the fit before printing on sublimation paper. This single habit saves more material than any other.
- Print at exactly 100% scale. Never let your printer scale to fit the paper. In your print dialog, set scaling to 100% or “actual size” — any scaling will change your dimensions.
- Print at 300 DPI minimum. The SVG template exports at 300 DPI. Set your design software to 300 DPI when designing on top of the template to ensure the output is sharp enough for sublimation.
- Keep design elements inside the safe area. The red rectangle in the template is your safe zone. Anything outside it may be lost when the wrap is applied — especially at the top and bottom edges where slight misalignment is common.
- The overlap zone is not a design area. The green zone on the right edge of the template is where the wrap seam joins. Design elements placed here will be doubled up or hidden under the seam. Keep it plain or use a subtle background pattern only.
- Use the centre lines for alignment. Text and focal design elements placed on or near the centre lines look balanced on the finished tumbler. Designs that are centred on the flat template will appear centred on the wrapped tumbler.
- Sublimate at the right temperature. Most sublimation blanks press at 385–400°F (196–204°C) for 60 seconds. Always check the specific instructions for your blank — sublimation temperature varies by blank coating and manufacturer.
Frequently Asked Questions
What size is a 20oz skinny tumbler wrap template?
A standard 20oz skinny tumbler wrap template size is 9.313″ wide × 8.210″ tall. However this varies by brand — the Hobby Lobby 20oz is 9.693″ × 8.477″, the Maars tumbler is 8.923″ × 7.523″, and the Built 20oz is 10.047″ × 7.407″. Always verify against your specific blank before printing. Use the generator above to download a template at the exact size you need.
What size is a 30oz skinny tumbler wrap template?
A standard 30oz skinny tumbler wrap template size is 10.045″ wide × 9.383″ tall. As with all tumblers, verify this against your specific blank — different manufacturers produce 30oz tumblers at slightly different dimensions even for the same nominal size.
What is bleed on a tumbler wrap template?
Bleed is a small safety margin added around the outside of the template so your design reaches the full visual edge of the wrap even with slight placement variation during application. The standard bleed for tumbler sublimation is ⅛” (0.125″) each side. The generator adds your chosen bleed to the base dimensions automatically — the template dimensions shown in the sidebar include the bleed.
What is the overlap on a tumbler wrap?
The overlap is the extra width on the right edge of the template where the wrap seam joins. The standard overlap for sublimation tumbler wraps is ¼” (0.25″). This ensures the seam joins cleanly without leaving a visible gap. The generator shows the overlap zone in green so you know to keep your design elements away from that area.
My tumbler size isn’t in the list — what do I do?
Use the Your Own Dimensions section at the bottom of the sidebar. Measure your tumbler’s circumference at the widest point for width, and its usable body height for height (from above the base ring to below the lid seat). Enter those measurements in inches, give your tumbler a name, and click Add to List. Your custom template will generate immediately.
Can I use this template for vinyl wraps as well as sublimation?
Yes — the template dimensions and guide system work for both sublimation and vinyl wraps. The overlap zone is especially useful for vinyl as it shows exactly where to place the seam. For vinyl cutting with Cricut, download the SVG and use it as a template layer in Cricut Design Space — import it, design on top of it, then hide the template layer before cutting.
Is this tumbler wrap template size guide free?
Yes, this tumbler wrap template size guide is completely free, no sign-up required, and your files never leave your browser. Download as many templates as you need for different tumbler sizes and brands.
More Free Tools for Cricut and Sublimation Crafters
- SVG Doctor — scan any SVG file for Cricut Design Space compatibility before you cut. Get a Cricut Readiness Score out of 100.
- Etsy Profit Calculator — work out your real margins on tumbler wraps and other Cricut products after all Etsy fees.
- Quote Designer — create custom quote SVG designs for your tumbler wraps, download as SVG and cut with Cricut.
- HTV vs Adhesive Vinyl Guide — which vinyl to use for which projects, with Cricut settings and troubleshooting.