Cricut Explore Air Blade Replacement
Do you need to change your Cricut Explore Air Blade Replacement?
Well, it’s time to learn how to change the blade and ensure flawless projects. Whether you’re a seasoned user or a beginner, this article will guide you through the process.
Maintaining the quality of your cuts is crucial, and using the correct blade housing is essential. In just a few simple steps, you’ll have a fresh blade ready to bring your creative ideas to life.
Let’s dive in and learn how to change the blade in your Cricut Explore Air 2!
The Importance of Changing the Blade
Why is it important for you to change the blade?
Regular blade maintenance has a multitude of benefits that ensure your Cricut Explore Air machine continues to deliver precise and clean cuts.
One of the key signs that indicate it’s time to change the blade is when it starts to drag or tear your material instead of cleanly cutting through it.
Using the correct blade option for specific projects is crucial to achieve the best results. Different blade options, such as fine point, deep point, or rotary blades, offer versatility for various materials and projects.
To properly clean and care for the blade, gently remove any debris that may have accumulated during cutting sessions. Regularly inspecting and cleaning the blade will help maintain its sharpness and prolong its lifespan.
Additionally, it’s wise to follow some tips for extending the lifespan of the blade, such as avoiding cutting through extremely thick materials or using excessive pressure.
Required Supplies for Blade Replacement
To replace the blade on your Cricut Explore Air machine, you’ll need the following supplies:
- Cricut Explore Air 2 machine
- Cricut Blade Housing (comes with the machine)
- Cricut Replacement Blade (multiple blades will last a long time)
These supplies are necessary for changing the blade.
Having the right supplies is essential for blade maintenance and ensuring its longevity. The Cricut Explore Air 2 machine is compatible with the Cricut Blade Housing, which comes with the machine. The Blade Housing holds the Cricut Replacement Blade, which is designed to last a long time, providing you with many successful cutting projects.
Proper blade care is crucial for optimal performance. By having a spare Cricut Replacement Blade on hand, you can easily swap out the old blade when it starts to show signs of wear or becomes dull. This will help troubleshoot any cutting issues you may encounter during your crafting journey.
Steps to Change the Blade on Cricut Explore Air
Once you have gathered the necessary supplies, you can easily change the blade on your Cricut Explore Air machine by following these steps.
If you’re experiencing any blade issues such as dullness or inconsistency in cutting, it might be time to replace the blade. Before replacing the blade, it’s important to troubleshoot the issue and ensure that the problem lies with the blade itself.
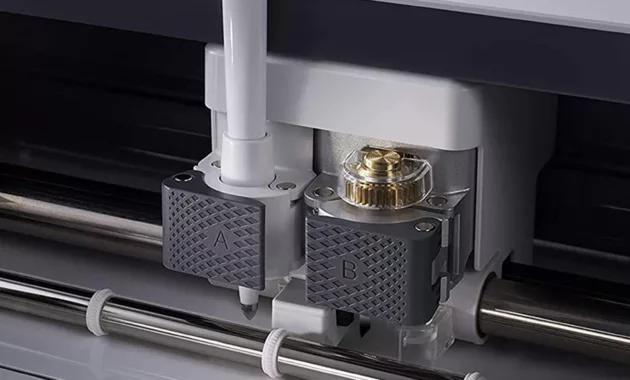
To begin, make sure the machine is powered off and unplugged for safety. Open the machine by pressing the open button and locate the blade housing inside in clamp B.
To remove the blade housing, loosen the clamp marked B by flipping it to the right. Gently pull out the blade housing from the clamp and push on the top of the housing to expose the blade.
Carefully pull on the exposed blade to release it from the housing. Take a new replacement blade and insert it into the housing, ensuring it’s properly inserted and shows a small portion. Drop the housing back into clamp B and flip the clamp back to the left to secure the housing.
By cleaning the blade housing regularly and extending the lifespan of the blade through proper usage and maintenance, you can further enhance the cutting performance. It’s important to note that there are different types of replacement blades available on the market, so choose the one that suits your needs.
To ensure a smooth blade replacement process, always follow the manufacturer’s instructions and guidelines. Take your time and be gentle when handling the blade and housing. With these tips in mind, you can confidently change the blade on your Cricut Explore Air machine and continue creating beautiful projects.
Replacing the Blade in the Housing
Insert the replacement blade carefully into the housing.
Here are some important tips for blade maintenance and care to help prolong the life of your blade and troubleshoot any blade issues you may encounter:
- Properly store your blade: When you’re not using your Cricut Explore Air, make sure to remove the blade from the housing and store it in a safe place. This will help prevent any damage to the blade and ensure it stays sharp for longer.
- Clean your blade regularly: After each use, it’s important to clean your blade to remove any debris or adhesive that may have accumulated. Use a soft cloth or brush to gently wipe the blade clean. This will help maintain the blade’s cutting performance and prevent any clogging.
- Replace the blade when necessary: If you notice that your blade is no longer cutting cleanly or is leaving marks on your materials, it may be time to replace it. Using a dull blade can’t only affect the quality of your cuts but also put unnecessary strain on your machine.
- Troubleshoot blade issues: If you’re experiencing any issues with your blade, such as it not cutting all the way through your material or skipping certain areas, try adjusting the blade depth or pressure settings. You can also try cleaning the blade and ensuring it’s properly inserted into the housing.
Completion and Next Steps After Blade Replacement
Now that you have replaced the blade, you’re ready to continue using your Cricut Explore Air for all your cutting projects. With a fresh blade, the possibilities are endless. Let’s explore some project ideas to inspire your creativity. From personalized home decor to custom clothing and intricate paper crafts, the Cricut Explore Air can bring your visions to life.
To ensure optimal performance, it’s important to maintain your blade properly. Regularly clean the blade housing and remove any debris that may accumulate during use. This will help prolong the lifespan of your blade and ensure clean, precise cuts every time. Additionally, make sure to follow troubleshooting tips provided by Cricut if you encounter any issues with your machine or blade.
Speaking of lifespan, it’s worth mentioning that the blade’s longevity depends on various factors such as the material being cut and the frequency of use. It’s recommended to replace the blade when you notice a decrease in cutting quality or if it becomes dull.
When it comes to storage, it’s essential to keep your blades in a safe place to prevent damage. Cricut offers blade storage options such as blade caddies and cases, which can help organize and protect your blades when not in use.
Now that you have completed the blade replacement, enjoy your Cricut Explore Air and let your creativity soar. Happy crafting!
Conclusion – Cricut Explore Air Blade Replacement
So there you have it! By following these simple steps, you can easily change the blade in your Cricut Explore Air 2 machine.
Remember, regularly replacing the blade is crucial for maintaining the quality of your cuts and ensuring flawless projects.
With a fresh blade, you can unleash your creativity and continue crafting with precision and confidence.
Happy crafting!


