Learn how to Upload an SVG to Cricut Design Space (Step-by-Step, with Pictures)
Got a gorgeous SVG cut file and can’t wait to craft? This friendly guide walks you through exactly how to upload a SVG to Cricut Design Space on desktop or web. You’ll learn the difference between Upload Image vs Image Library, how to name and tag uploads for easy searching, what to do when layers look “odd” on the Canvas, and the most common errors (plus fixes). We’ll also share quick tips to size, color-sync, and prep your design before you hit Make It.
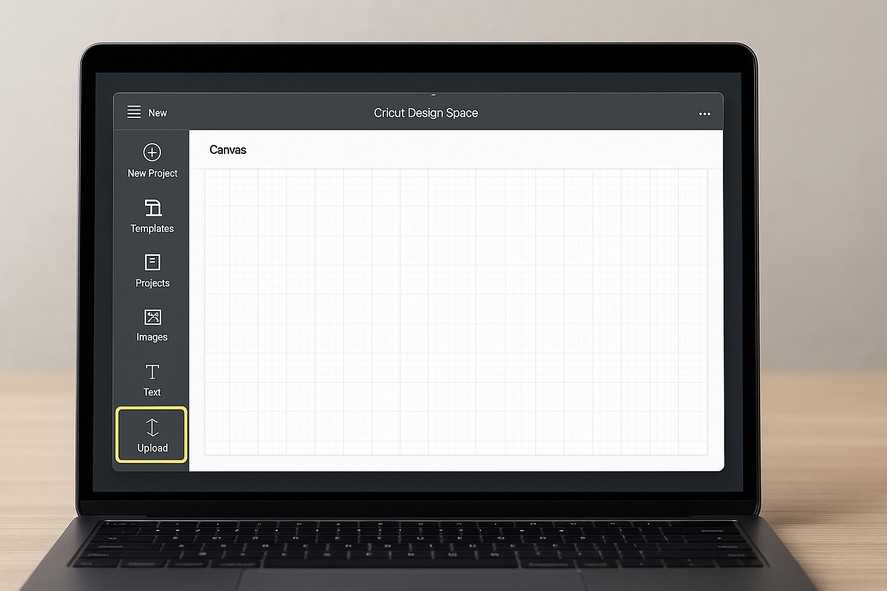
Table of Contents
- What is an SVG (and why Cricut loves it)?
- Before You Start: Check Your File
- How to Upload an SVG to Design Space
- Prep on the Canvas: Size, Color, Attach, Weld
- Troubleshooting: Common Upload Errors
- FAQ
What is an SVG (and why Cricut loves it)?
SVG stands for Scalable Vector Graphics. Instead of pixels, SVGs use vector paths—so they scale perfectly with crisp edges. Cricut Design Space reads those paths and turns them into cut lines, score lines, and draw paths. Compared with PNG/JPG, SVGs cut faster, weed easier, and keep details sharp at any size.
Need a starter file? Grab a design from our Free SVG library (personal and commercial use free):
https://crafty-crafter.club
Before You Start: Check Your File
• Make sure it’s really an SVG: the filename should end in .svg. If you downloaded a .zip, unzip it first.
• One file, many layers: an SVG can include multiple colors/layers which you can rearrange later on the Canvas.
• Don’t double-click to “open” it: on some computers, double-clicking may open the SVG in a web browser. That’s normal. You still upload it from inside Design Space.

How to Upload a SVG to Design Space

- Open Cricut Design Space. Log in and click New Project. If you’re completely new, Cricut’s quick-start guides are here: https://help.cricut.com/
- Go to Upload. On the left toolbar, click Upload → Upload Image.
- Browse to your SVG file. Click Browse and select your .svg. You’ll see a preview.
- [Image: Cricut Design Space Upload Image dialog with an SVG selected and previewed]
- Caption: Design Space shows a preview of your SVG before saving.
- Name and tag your image. Give it a helpful name (e.g., “Coffee Quote SVG”) and add tags (e.g., coffee, quote, mug) so you can find it later in your library.
- Click Save. Your SVG appears in Recent Uploads and your personal library.
- Select the upload and click Add to Canvas. The design opens on the Canvas ready to edit, size, or color.
- Tip: Prefer detailed official docs? Cricut keeps instructions updated in the Help Center: https://help.cricut.com/
Prep on the Canvas: Size, Color, Attach, Weld
Once your SVG is on the Canvas, use these quick steps to get clean, predictable cuts:
• Size: With the design selected, set width/height in the top toolbar. Keep the “lock” on to scale proportionally.
• Color: Assign colors to layers so Design Space groups them onto separate mats. Use Color Sync to combine matching colors.
• Attach: Select items that must hold their relative position (like letters with a shadow) and click Attach. This prevents Design Space from auto-arranging them on the mat.
• Weld: For overlapping shapes that should become one continuous cut (like script letters), select them and click Weld.
• Offset (optional): Add a small outline behind words for vinyl decals or stickers.

When everything looks right, click Make It to send mats to your machine. Choose material settings, mirror if needed for iron-on, and you’re off!
Troubleshooting: Common Upload Errors
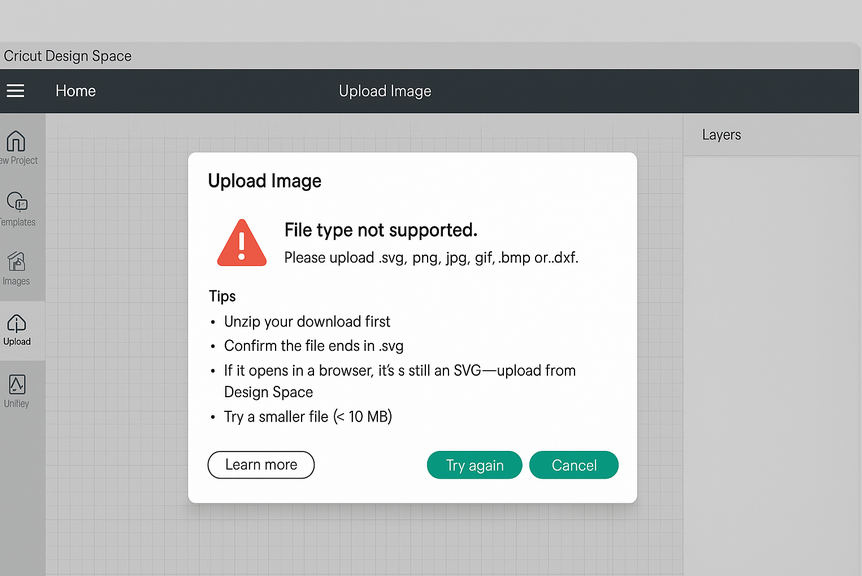
• “File type not supported” — Ensure it’s .svg, not a web page, .png, or .jpg. If you downloaded a .zip, unzip it and upload the SVG inside.
• SVG opens but looks “blank” — Your SVG may be all white on a white Canvas. Try changing layer colors or selecting everything (Ctrl/Cmd+A). Zoom out to find off-Canvas elements.
• All one layer — Some SVGs are intentionally single-layer (e.g., silhouettes). If it should be layered, Ungroup in the Layers panel or check whether the designer welded elements.
• Weird tiny/huge size — SVGs store sizes in different units. Just rescale on the Canvas to your intended size.
• Font missing — If the design uses a font you don’t have and text wasn’t converted to outlines, Design Space may substitute. Ask the designer for an outlined version or install the font.
Still stuck? Try the Help Center:
Help Center: https://help.cricut.com/
FAQ
Can I upload unlimited SVGs?
Yes—Design Space lets you upload your own images, including SVGs, and organize them with names/tags for personal use.
Do I need to flatten my SVG?
Flatten is for turning multiple layers into a single printable image for Print then Cut. For normal cutting, you’ll rarely flatten SVGs.
Why won’t my SVG export from Design Space?
Design Space doesn’t export Canvas objects as SVG. Keep your original SVG file on your computer for re-use.
Where can I find quality SVGs?
Right here! Explore our Free SVG library to test your upload steps: https://crafty-crafter.club
Ready to Craft?
Upload your SVG, size it on the Canvas, Attach or Weld where needed, then click Make It. For more projects and freebies, visit our Free SVG hub:
https://crafty-crafter.club
[…] If you’re new to using SVG files, check out our guide on how to upload SVG files to Cricut Design Space. […]