If you’re torn between HTV vs Adhesive Vinyl, here’s the quick way to choose. For fabric projects like shirts and tote bags, go HTV (iron-on). For hard, smooth surfaces—mugs, jars, acrylic signs—use adhesive vinyl. In this guide, we compare iron-on vs adhesive vinyl by surface, durability, application, and care, then share sizing and troubleshooting tips so your cuts weed cleanly and last longer. You’ll also learn when to mirror, which transfer tape to pick, and how to fix lifting edges. By the end, you’ll know exactly which vinyl to use for each project. Both materials cut beautifully on Cricut and Silhouette machines, both come in gorgeous finishes, and both can make a simple project look pro. But they behave very differently once you leave the cutting mat. This guide breaks down the differences in plain language—surfaces, durability, tools, sizing, care, and troubleshooting—so you can pick the right vinyl every single time.
Iron-On vs Adhesive Vinyl (The Quick Answer)
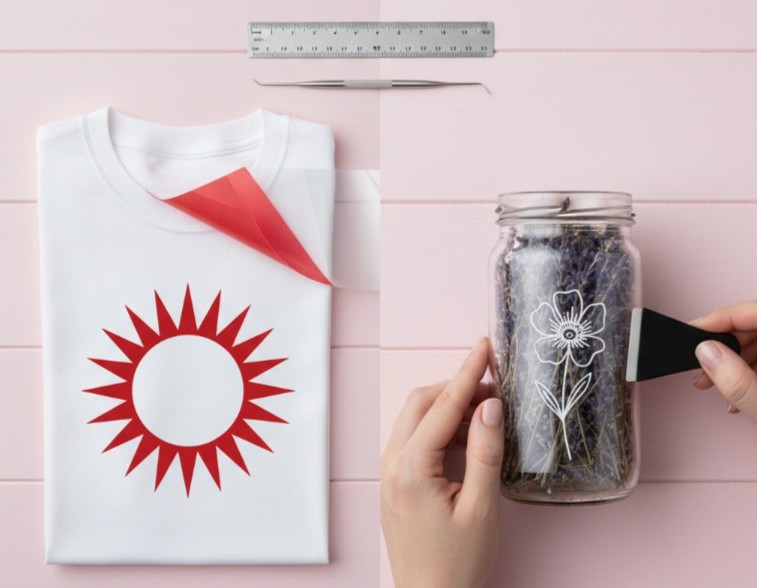
- Choose HTV (iron-on) when you’re decorating fabric or soft goods: t-shirts, hoodies, baby bodysuits, tote bags, canvas pouches, cotton aprons, fabric banners, and many caps. HTV uses heat + pressure to bond to the fibers, and—when applied correctly—survives wash after wash.
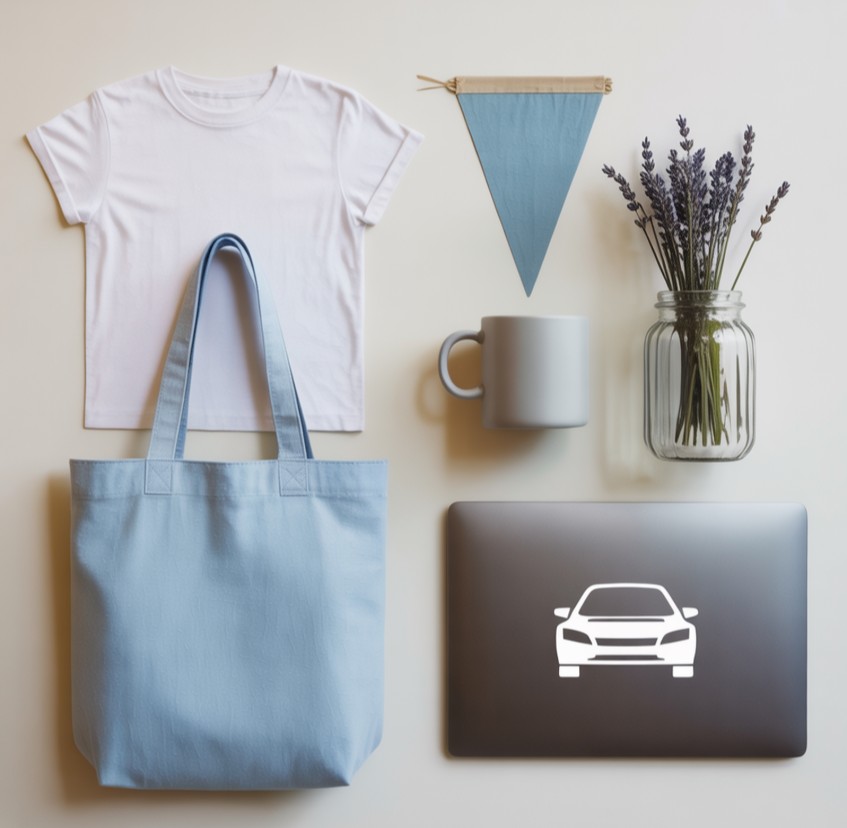
- Choose adhesive vinyl when you’re decorating hard, smooth, non-porous surfaces: mugs, tumblers, water bottles, glass, ceramic, plastic bins, metal signs, sealed or painted wood, laptops, phone cases, mirrors, and car windows. It’s pressure-sensitive and applied with transfer tape.
If you remember nothing else: Fabric → HTV. Hard & smooth → Adhesive.
What Is HTV and When Should You Use It?
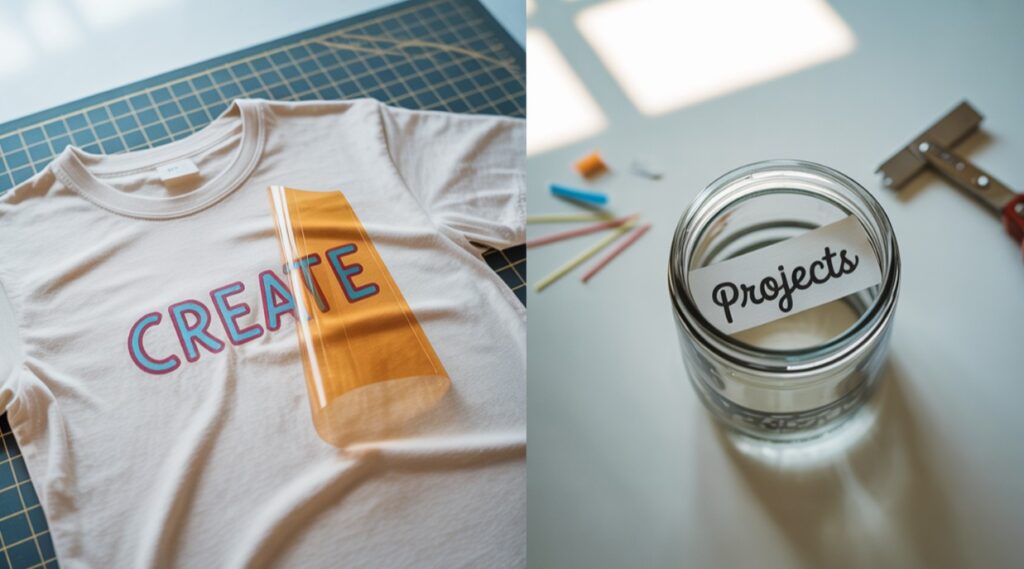
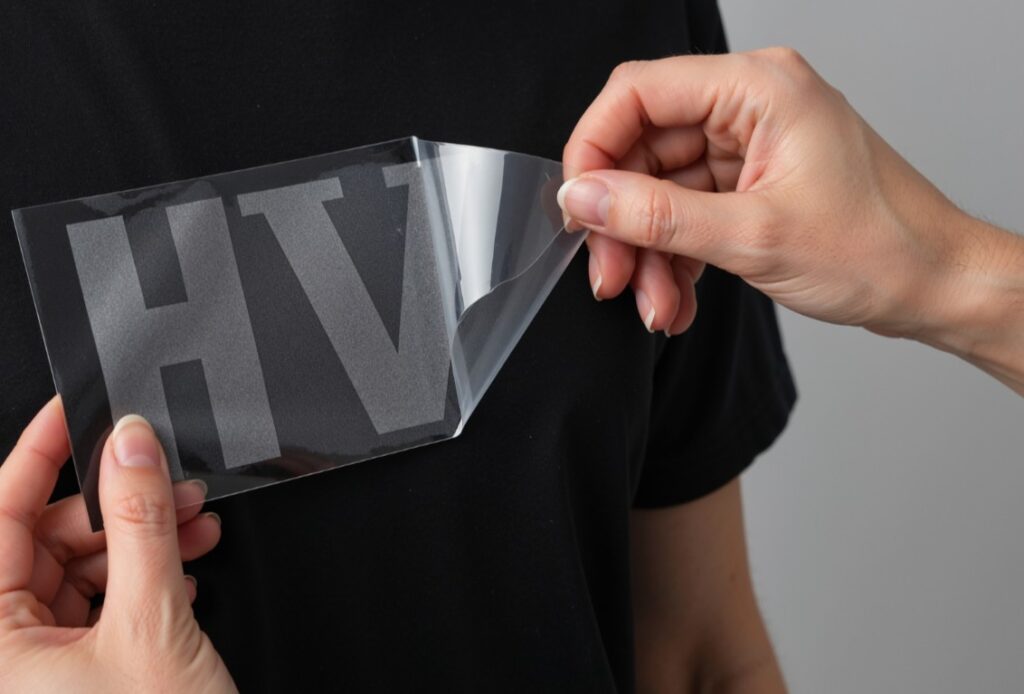
HTV is a vinyl film with a heat-activated adhesive on the back. The adhesive stays dormant until you apply heat + firm pressure with a heat press or household iron. Most HTV sheets have a clear shiny carrier sheet on top that acts like built-in transfer tape. You cut the design in reverse (mirror), weed the excess, and press. After pressing, you peel the carrier hot, warm, or cool depending on the brand/type.
Where it shines
- Apparel and fabric items (cotton, cotton-poly blends, some performance fabrics).
- Projects that need to withstand washing and bending.
- Multi-color designs where you want layering or special finishes (glitter, flock, puff, holographic).
Pros
- Soft, flexible finish on fabric.
- Very durable when applied correctly.
- Lots of specialty looks (glitter, flock, stretch, metallic, puff).
Cons
- Requires heat source and pressure.
- Not ideal on very heat-sensitive fabrics (some nylons, delicate synthetics).
- Must mirror designs; layering needs planning.

What Is Adhesive Vinyl and When Is It Better?
Adhesive vinyl is a pressure-sensitive film with a sticky backing. You do not mirror it. After cutting and weeding, you lift the design with transfer tape and burnish it onto your surface. It adheres immediately and strengthens as it cures (usually a day or two).
Two main types
- Removable: easier to reposition and remove with minimal residue; great for walls, seasonal décor, and temporary labels.
- Permanent: stronger adhesive; ideal for mugs, outdoor decals, car windows, mailboxes, toolboxes—anything that faces handling or the elements.
Pros
- No heat gear required.
- Perfect for hard, smooth surfaces.
- Fast application; wide range of glossy, matte, frosted, and patterned films.
Cons
- Not wash-durable on fabric.
- Can struggle on textured/porous surfaces unless sealed or specially prepped.
- Some finishes need the right tack of transfer tape to release properly.
Permanent vs Removable Adhesive Vinyl (Mugs, Walls, Outdoors)
Go HTV (iron-on) for:
- T-shirts, hoodies, sweatshirts
- Baby bodysuits and kids’ tees
- Tote bags and canvas pouches
- Tea towels and fabric aprons
- Fabric pennant banners and flags
- Some caps (with cap press or careful iron technique)
Go adhesive vinyl for:
- Mugs, tumblers, water bottles (hand-wash recommended)
- Pantry jars and canisters
- Mirrors and picture frames
- Laptops, tablets, chargers, phone cases
- Car windows and bumpers (outdoor-rated permanent)
- Sealed or painted wood signs and acrylic blanks
Removable adhesive is perfect for wall decals, seasonal décor, classroom labels, and rentals where you want a clean peel later.
Finishes & specialty variants
HTV flavors you’ll love
- Everyday/regular (often called “easy weed”): thin, flexible, user-friendly—your go-to for shirts.
- Stretch/athletic: formulated for performance wear and leggings; moves with the fabric.
- Glitter: sparkly surface that pops on kids’ tees and spirit wear (typically not layerable on top).
- Flock: velvety, raised texture—gorgeous for retro looks and winter designs.
- Metallic/foil: shiny and reflective; watch temps and peel instructions.
- Puff: expands when heated for a 3D effect; press time/temp matters a lot.
Adhesive vinyl options
- Glossy/matte: everyday choices for labels and decals.
- Frosted/etched: beautiful on glass for a faux-etch look.
- Outdoor “permanent”: stronger adhesive and weather resistance for cars and signs.
- Printable (inkjet with laminate): lets you print and then cut; protect with a clear laminate layer for durability.
- Patterned: pre-printed designs to mix and match with solids.
Tools & prep: what you really need
For HTV
- Heat press, Cricut EasyPress, or an iron (press gives more even heat).
- Firm, heat-safe surface (avoid squishy ironing boards for pressing).
- Teflon sheet or parchment (optional), and a pressing cloth for delicate fabrics.
- Lint roller to clean fibers before pressing.
- Weeding tools and heat-resistant tape for small placements.
For adhesive
- Transfer tape matched to your vinyl finish (standard tack for glossy; lower-tack for textured/matte if needed).
- Scraper/burnisher for firm pressure.
- Surface cleaner: isopropyl alcohol (IPA) wipes or mild dish soap + water. Avoid oily cleaners.
- Weeding tools and a squeegee with felt edge for delicate surfaces.
Prep that changes everything
- Fabric: pre-press 3–5 seconds to remove moisture and wrinkles.
- Hard surfaces: degrease thoroughly; allow to dry completely before applying adhesive vinyl.
Time, temperature & pressure (reliable starting points)
Every brand has its own recipe, but these ranges help you get in the ballpark:
- HTV (everyday): 150–160 °C (300–320 °F), 10–15 seconds, medium-firm pressure.
- Glitter/metallic HTV: often a touch hotter or longer; check the label.
- Peel: hot/warm/cool depends on the product—always check the peel type.
Two golden rules:
- Test on a scrap—especially for specialty films.
- Pressure matters as much as temperature. If edges lift, increase pressure and repress briefly.
Sizing & layout tips (so your design looks pro)
- Mugs (11–15 oz): main wrap 3–3.5 in (7.5–9 cm) wide; keep tallest point under 3.5 in to avoid lip/curve issues.
- Adult tees: chest designs 8–10 in (20–25 cm) wide; kids 6–8 in (15–20 cm).
- Tea towels: center near the bottom third; widths 6–8 in look balanced.
- Door/desk signs: let the background breathe—use negative space so lettering reads from a distance.
- Layering HTV: Whenever possible, stack least on top (e.g., put glitter as top layer only) or use knockout methods to keep the final stack thin.
Troubleshooting: Peeling HTV, Lifting Decals & Bubbles
HTV peeling or cracking
- Under-pressed or under-heated: bump pressure first, then temperature.
- Fabric still damp: always pre-press.
- Washed too soon: let it cure 24 hours before the first wash.
Edges of HTV lifting after a few washes
- Cover with parchment and repress 5–10 seconds with firm pressure.
- Check that you used the right time/temp and peeled at the proper stage (hot/warm/cool).
Adhesive vinyl won’t stick
- Surface wasn’t truly clean: wipe with isopropyl alcohol and dry completely.
- Surface is textured/porous: use a smoother blank or seal first; switch to permanent adhesive.
- Transfer tape mismatch: try a lower-tack tape for matte or a higher-tack for stubborn glossy films.
Can’t lift the design from the backing
- Burnish the transfer tape on the front and back (flip it over and scrape the liner).
- Warm the vinyl slightly with a hair dryer to relax the adhesive, then try again.
Wrinkles or bubbles under adhesive
- Work from the center outward with your squeegee in small passes.
- For tiny bubbles, pinprick and burnish.
Care & durability
HTV apparel care
- Wait 24 hours before washing.
- Inside-out, cold or warm cycle, mild detergent.
- No fabric softener (it can lift edges).
- Tumble low or hang dry; avoid direct ironing over the design (use a pressing cloth if needed).
Adhesive vinyl care
- Hand-wash mugs/tumblers to extend life (even if many survive top-rack dishwashers, heat + detergent are harsh).
- Allow new decals to cure 24–48 hours before heavy use or exposure to water.
- Outdoor decals last longer on clean, smooth surfaces; avoid waxed or oily finishes.
Comparison at a glance
| HTV (Iron-On) | Adhesive Vinyl | |
|---|---|---|
| Best surfaces | Fabric, soft goods | Hard, smooth, non-porous (glass, plastic, metal, sealed wood, acrylic) |
| Application | Heat + firm pressure; mirror design | Transfer tape + burnish; do not mirror |
| Durability | Wash-durable when applied and cared for correctly | Excellent on hard surfaces; outdoor-capable (permanent) |
| Typical uses | Tees, hoodies, totes, aprons, banners | Mugs, jars, signs, laptops, car decals, wall graphics |
| Gear needed | Heat press/EasyPress/iron, pressing surface | Transfer tape, scraper/burnisher, surface cleaner |
| Specialty | Glitter, metallic, flock, stretch, puff | Glossy/matte, frosted, outdoor permanent, printable, patterned |
HTV vs Adhesive Vinyl—FAQ
1) What’s the real difference between HTV and adhesive vinyl, and how do I choose?
HTV (heat transfer vinyl, a.k.a. iron-on) bonds to fabric and other soft goods using heat + pressure. You cut it in reverse (mirror), weed, press, and peel the clear carrier. Done right, it flexes with the fabric and survives many washes. Adhesive vinyl is a pressure-sensitive “sticker” for hard, smooth, non-porous surfaces (glass, plastic, metal, sealed wood, acrylic). You cut it normally (no mirror), lift with transfer tape, burnish, and peel the tape away.
Simple rule: If the surface is soft/fabric, choose HTV. If it’s hard & smooth, choose adhesive vinyl. Everything else—finishes, colors, brands—comes second to that surface decision.
2) Permanent vs removable adhesive vinyl—when should I use each?
Removable adhesive vinyl is ideal for temporary installs and delicate finishes: wall decals in rentals, seasonal window clings, classroom labels, party décor. It releases more cleanly, which helps prevent paint lift.
Permanent adhesive vinyl has a stronger adhesive for high-contact and outdoor situations: mugs, tumblers, car windows, mailboxes, toolboxes, coolers, and signs. It resists moisture and handling better, but is harder to remove later. For drinkware, clean thoroughly, apply carefully, and allow 24–48 hours to cure before first wash.
3) Do I mirror my cut? What about time/temperature/pressure for HTV?
Mirror only for HTV. Most HTV is cut with the shiny carrier face down, adhesive side up, so you must mirror the artwork. Do not mirror adhesive vinyl—cut it as shown.
Time/Temperature/Pressure: Always follow your brand’s chart, but as a starting point, everyday HTV often presses around 150–160 °C (300–320 °F) for 10–15 seconds with medium-firm pressure. Specialty films (glitter, metallic, puff, stretch) may need different settings and peel stages (hot/warm/cool). When in doubt, do a small test press and adjust pressure first—consistent, firm pressure fixes more problems than extra heat.
4) Adhesive vinyl isn’t sticking or keeps lifting—what am I doing wrong?
Three common culprits:
- Surface prep: Degrease with isopropyl alcohol (IPA) or mild dish soap + water, then dry completely. Oils from hands or manufacturing residue are the #1 cause of lift.
- Wrong vinyl/tape pairing: Glossy adhesive usually loves standard/medium-tack transfer tape. Matte, textured, or glittery adhesive may need a lower-tack tape so it releases cleanly from the tape onto the blank.
- Cure time: Even permanent adhesive benefits from a 24–48 hour cure before heavy use or washing. Burnish firmly, then let the adhesive settle.
If release from the liner is the issue, burnish the transfer tape on the front and back (flip over and scrape the liner), then peel the tape away at a sharp angle, slow and steady.
5) My HTV peels after a few washes—how do I fix it and prevent it?
To fix: Cover the area with parchment/Teflon and repress 5–10 seconds using firm pressure. If edges still lift, increase pressure slightly and check you’re peeling at the correct stage (some HTV is hot peel, others warm or cool).
To prevent: Pre-press the garment 3–5 seconds to remove moisture, use the brand’s recommended time/temperature, and apply consistent, firm pressure across the entire design. Let the HTV cure 24 hours before the first wash. For care, wash inside-out on cold/warm, skip fabric softener, and tumble low or hang dry.
6) Can I layer vinyl? (HTV on HTV, adhesive on adhesive, mixing finishes)
HTV: Everyday HTV layers nicely if you keep stacks thin. As a rule, put specialty HTV (glitter, metallic, flock, puff) as the top layer only. For crisp results, use a knockout design: remove overlapping areas from the bottom color so the top color sits directly on the fabric instead of stacking thick layers.
Adhesive: You can layer, but thick stacks catch edges over time. For logos and decals, registration or knockout methods (butting colors together) keep surfaces smooth and long-lasting.
7) What sizes should I use for shirts, mugs, and signs so designs look balanced?
Shirts: Adult chest designs often land between 8–10 in (20–25 cm) wide; youth sizes closer to 6–8 in (15–20 cm). Place 2–3 inches below the collar for a balanced look. For tall designs, let the height—not just width—guide you so it doesn’t crowd the neckline or hem.
Mugs (11–15 oz): A popular wrap width is 3–3.5 in (7.5–9 cm) with a max height around 3.5 in to avoid the lip and handle curves. For both adhesive decals and HTV-on-mug hacks (using sublimation-safe blanks), keep the tallest points within the “flat” area.
Signs & acrylic blanks: Prioritize readability at distance. Use ample negative space; many designs look better a hair smaller than you think so the lettering can breathe.
8) How do I care for projects so they last (HTV apparel + adhesive drinkware/decals)?
HTV apparel: Allow 24 hours before first wash. Turn garments inside-out, wash cold/warm with mild detergent, avoid fabric softener, and tumble low or hang dry. If you must iron, cover with a pressing cloth and avoid direct heat on the design.
Adhesive vinyl on mugs/tumblers: Hand-wash for best longevity. High heat + strong detergents reduce life, even for permanent adhesive. Always let fresh decals cure at least 24–48 hours before the first wash. Outdoor decals last longest on clean, smooth surfaces; avoid waxed or oily finishes.
Step-by-step: your first project in each category
A perfect first HTV project—classic t-shirt
- Choose a single-color everyday HTV and a cotton tee.
- Cut mirrored; weed carefully.
- Pre-press the shirt 3–5 seconds to remove moisture.
- Place the design, press at the recommended temp for 10–15 seconds with firm pressure.
- Peel carrier as directed (hot/warm/cool).
- Cover and quick repress 3–5 seconds if needed.
- Wait 24 hours before washing.
A perfect first adhesive project—pantry label set
- Clean jars with isopropyl alcohol; dry thoroughly.
- Cut your label set (no mirroring).
- Weed and apply standard-tack transfer tape.
- Position, burnish center-out, then peel the tape low and slow.
- Let cure 24–48 hours before washing or heavy handling.
Smart buying tips (save money, save frustration)
- If you’re new, start with everyday HTV and glossy permanent adhesive in black/white—those colors get used constantly.
- Buy sample packs to test finish and tack before committing to big rolls.
- Keep two transfer tapes on hand: a “standard” and a lower-tack version for matte or delicate surfaces.
- Track what works: note the brand, temp, time, pressure, peel in a notebook or on your phone for repeatable results.
Final thoughts: choose with confidence
You don’t need a giant stash to make pro-quality crafts. Decide by surface first, then pick the material that was designed for that job:
- Soft/fabric things? Use HTV—mirror your cut, press with confidence, and enjoy a soft, durable finish.
- Hard, smooth things? Use adhesive vinyl—clean the surface, use the right transfer tape, and burnish well.
Once you’ve nailed those basics, have fun with specialty finishes—glitter for sparkle, flock for retro, frosted for glass, puff for 3D tees, and outdoor permanent for decals that brave the elements. With the right vinyl on the right surface, your projects will look polished, last longer, and earn you those “Wait… you made that?!” compliments every crafter lives for.
Download this file then check it's Cricut-ready with SVG Doctor before you cut — it scans for stray nodes, layer issues, and anything that might cause problems in Design Space.
Check My SVG Free →
[…] players and fans always need a water bottle! Use permanent adhesive vinyl to apply the SVG design. The My Heart Beats for Softball design wraps perfectly around […]
[…] high-quality vinyl, cardstock, or heat-transfer materials to get a clean cut and smooth […]