Looking for a hilarious, budget-friendly project that makes a big splash at craft fairs, bathroom makeovers, or white-elephant parties? Sublimated toilet paper is a crowd-pleaser. It looks incredible in a gift bag, it’s quick to make, and with the right prep—like using sublimate spray—you can get crisp, colorful results on a surface that’s famously… not polyester.
Below you’ll find a full, beginner-friendly walkthrough that covers supplies, setup, pressing, troubleshooting, and tons of image ideas to help your blog, shop listings, or social posts shine.
Why Sublimate on Toilet Paper?
- Gag gifts that feel custom: Funny bathroom quotes, holiday motifs, and cheeky puns are perennial bestsellers.
- Fast and affordable: You can create a premium-looking novelty for just pennies in consumables.
- Great practice: It’s a low-risk way to practice color management and press technique.
Note: These rolls are decorative/novelty items. They’re safe to display and gift, but the press process and sublimate spray can change the feel of the top sheet. Most crafters present the roll for display while the rest of the roll remains usable.
What Is Sublimate Spray—and Why Use It?
Sublimation ink bonds best with polyester. Regular toilet paper is cellulose (paper), so prints can look muted or wash out. Sublimate spray is a polymer coating you apply to your surface to simulate a polyester layer. On toilet paper, a light, even coat lets your design sublimate brighter and sharper with less bleed.
Key tips for sublimate spray:
- Choose a product made for sublimation coatings.
- Apply in light mists, not heavy soaks.
- Allow full dry time between coats.
- Ventilate your workspace and follow the manufacturer’s safety instructions.
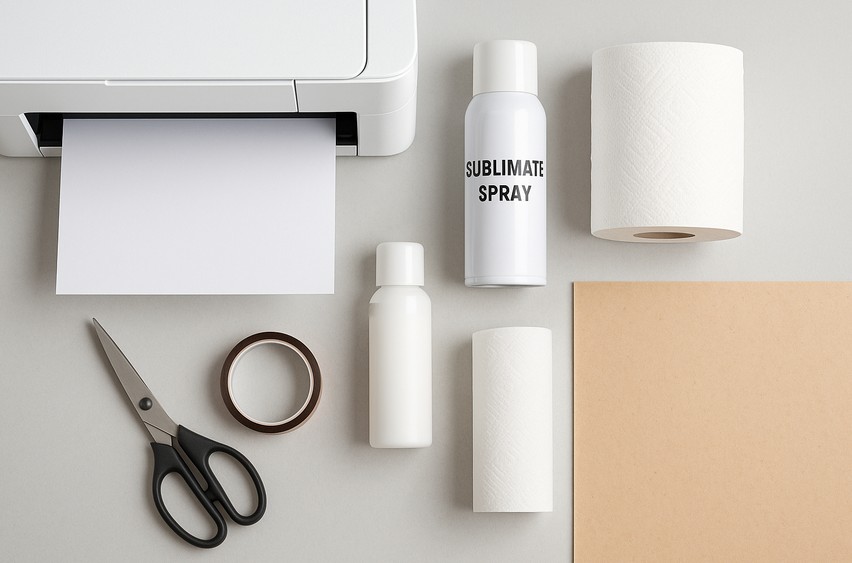
Supplies & Tools
- Sublimation printer (Epson/SG with true sub ink)
- Sublimation paper (high-release)
- Heat press (a clamshell or swing-away is easiest for flat pressing the sheet; you can also use a small press for patches)
- Sublimate spray (polymer coating)
- Heat-resistant tape
- Butcher paper or parchment (lots—use fresh each press)
- Cardstock (to support the tissue while pressing)
- Plain, quality toilet paper (2-ply with a relatively smooth face sheet)
- Lint-free cloth or soft brush (optional, to lift stray fibers)
- Gloves and mask/respirator (when spraying)
- Hair dryer or heat gun (optional, to speed dry—gentle setting)
- Ruler & light pencil (for alignment marks)
Designs: Funny bathroom quotes, holiday graphics, farmhouse wreaths, initials, and monograms work beautifully. If you need ready-to-use graphics and fonts, browse Creative Fabrica for thousands of sublimation-ready bundles and fonts you can mix and match.
Design & Layout Tips (Before You Print)
- Size to the face sheet: Most rolls have ~4.5″ (11.4 cm) wide sheets. Design a main graphic about 3–3.75″ wide to leave margin and reduce edge bleed.
- High contrast pops: Bold typography and simple illustrations print best.
- Avoid ultra-thin lines: Very fine details can blur on tissue; slightly thicken strokes.
- Mirror your design before printing (standard for sublimation).
- Color testing: Print a tiny swatch on a sprayed scrap sheet to verify vibrancy and bleed behavior.
Step-by-Step: How to Sublimate on Toilet Paper with Sublimate Spray
1) Prep Your Workspace
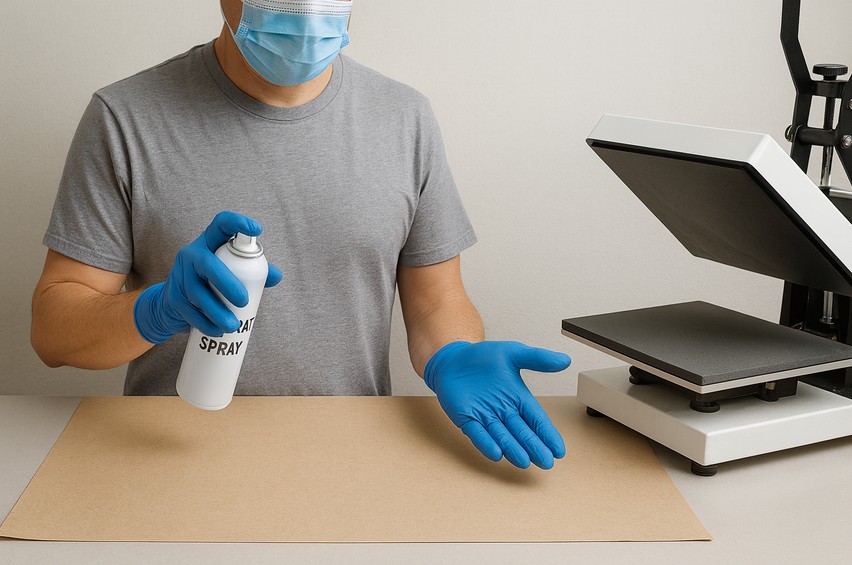
- Cover your area with butcher paper for overspray and ink.
- Ventilate well. Wear gloves and a mask when spraying.
- Pre-heat your press to 360–385°F (182–196°C). Start lower (e.g., 365°F / 185°C) if your paper scorches easily and adjust as needed.
2) Prepare the Toilet Paper for Coating
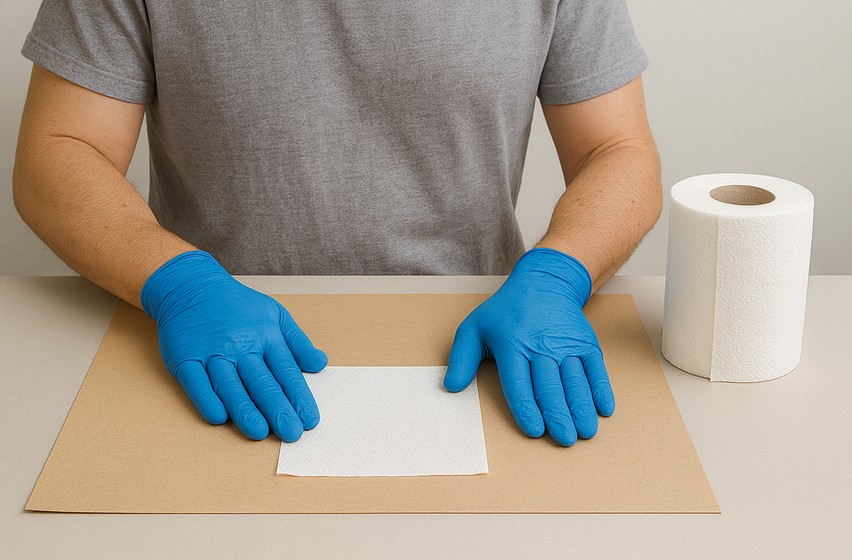
- Unroll a single face sheet and lay it flat on clean cardstock. Keep the rest of the roll tidy.
- Very lightly smooth the sheet—don’t stretch it. If your TP is very textured, pick the smoother side.
3) Apply the Sublimate Spray
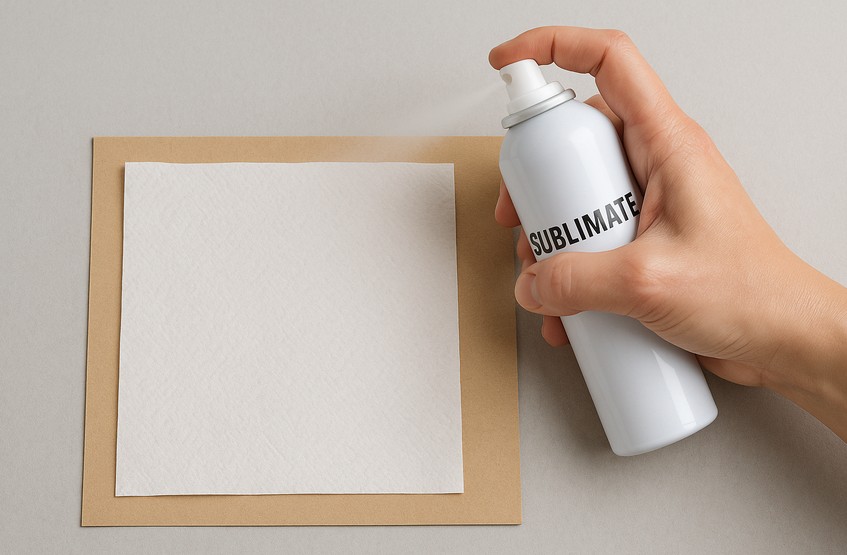
- Shake the can/bottle per instructions.
- Spray a light, even mist over the face sheet from ~8–12 inches (20–30 cm) away.
- Let it dry completely (5–15 minutes, or use a hair dryer on low).
- If your first tests look muted, add a second very light coat. Avoid saturating, which can make the sheet stiff or wrinkly.
Pro tip: Keep a few extra sprayed sheets ready. You can sublimate multiple designs in one session, which saves time.
4) Print Your Design
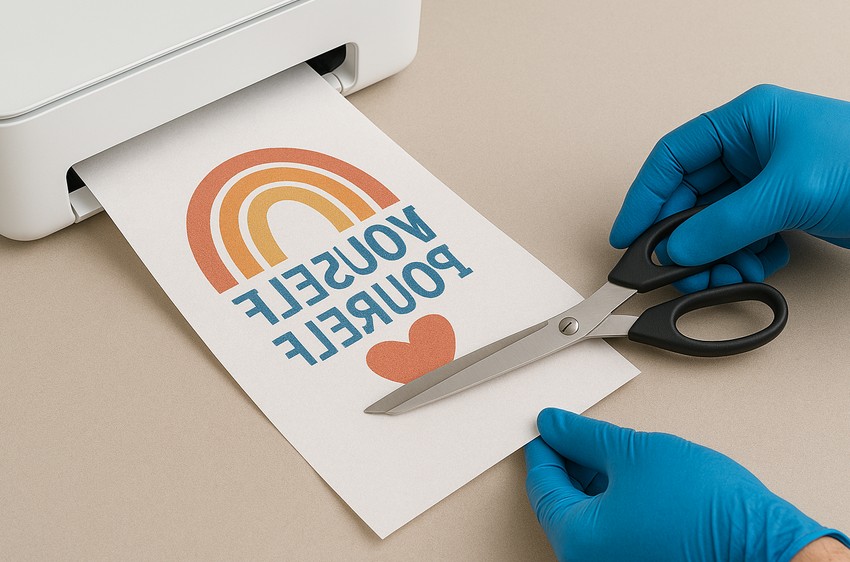
- Print on sublimation paper with the highest quality/photo setting your printer allows.
- Mirror the design.
- Trim the print, leaving a small border so tape won’t touch the inked area.
5) Align & Tape
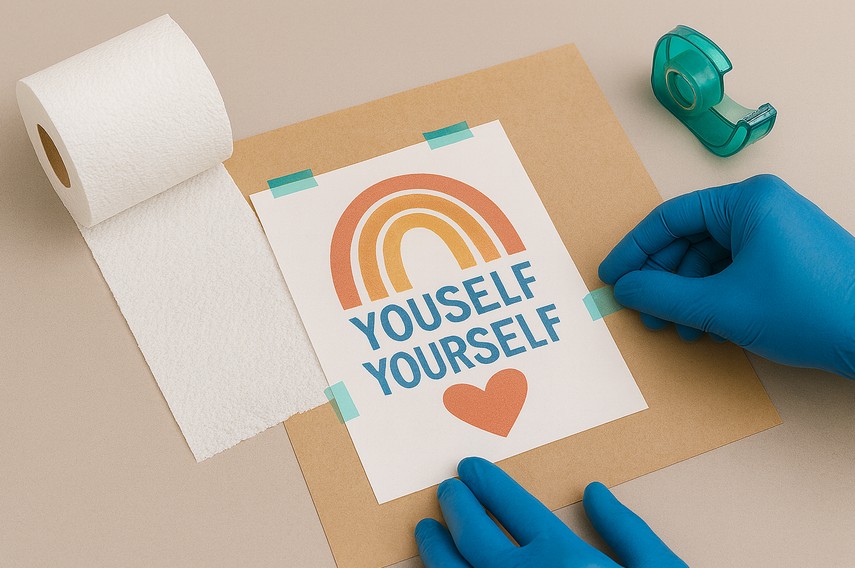
- Place the trimmed, ink-side-down print on the sprayed toilet paper sheet (on the cardstock).
- Add two tiny pieces of heat tape at opposite edges. Less tape = less chance of impression marks.
6) Press Sandwich
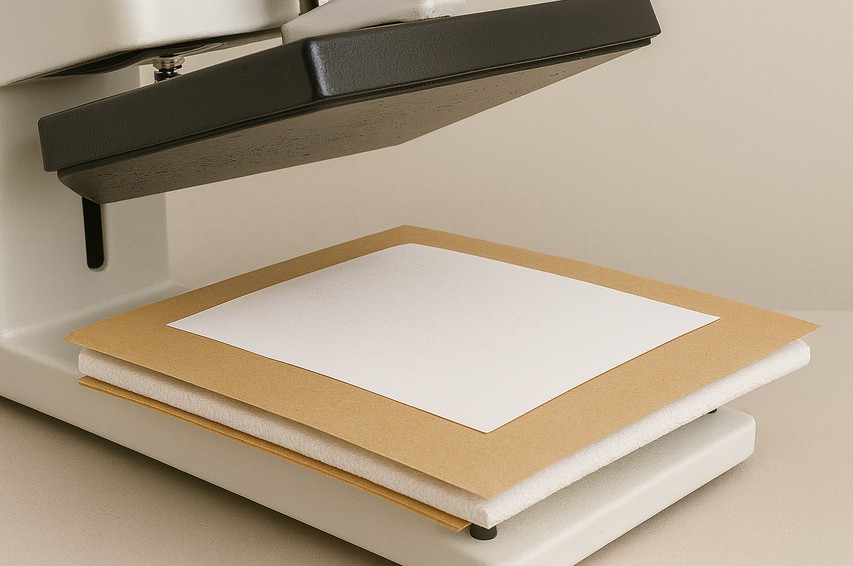
Build your stack on the press platen:
- Butcher paper (protects the press)
- Cardstock with TP sheet + taped transfer
- Butcher paper on top
Press settings to start:
- Temperature: 365–375°F (185–190°C)
- Time: 30–45 seconds
- Pressure: Light to medium (just enough to keep it flat)
Every press, paper, and spray varies. Start low and adjust.
7) Cool & Reveal
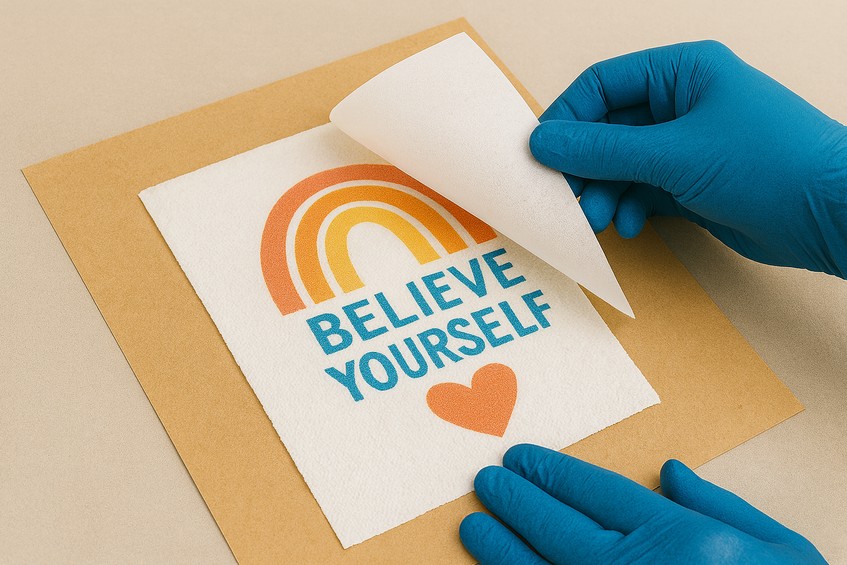
- Open the press and slide the stack off to a cool surface.
- Let it cool a few seconds; carefully peel back the transfer.
- If color looks slightly light, increase time by 5–10 seconds or temp by 5–10°F next attempt.
8) Wrap the Roll for Presentation
- Re-attach the decorated sheet to the roll so the design faces outward.
- Add a small belly band, ribbon, or kraft tag with a punny line:
- “For emergencies only!”
- “Official Bathroom Humor”
- “You’re on a roll!”
Troubleshooting & Fine-Tuning
Problem: Scorching or yellowing
- Lower temp to 355–365°F (179–185°C) and reduce time by 5–10 seconds.
- Add an extra sheet of butcher paper on top to diffuse heat.
Problem: Ink bleed/feathering
- Apply lighter coats of sublimate spray. Heavy coats cause wicking.
- Shorten press time slightly.
- Choose smoother TP or switch to a brand with tighter weave.
Problem: Dull colors
- Add a second very light spray coat and ensure it’s fully dry.
- Increase time by 5–10 seconds or temperature by ~5°F.
- Confirm your printer is on high-quality/photo mode.
Problem: Tape marks or indentations
- Use smaller pieces of heat tape, away from the design edge.
- Reduce pressure slightly.
Problem: Ghosting/shadows
- Use two tiny tape tabs and keep the stack flat while closing/opening the press.
- Cool briefly before removing the paper so steam doesn’t lift the fibers.
Creative Design Ideas (That Sell!)
- Bathroom Quotes: “Wash Your Hands,” “No Selfies in the Bathroom,” “Sprinkles are for Cupcakes.”
- Holiday Packs: Santa “Ho Ho Hold It,” Halloween “Creep It Real,” Easter “For Your Peeps.”
- Farmhouse & Monograms: Wreath monograms, serif initials with laurel branches.
- Special Events: Bridal shower puns, new-home gift baskets, milestone birthdays.
- Kids’ Bath Humor: Dinosaurs, rubber duckies, silly monsters with speech bubbles.
- Color Blocks: Minimalist shapes in neutrals to match modern bathrooms.
Need art, fonts, or bundles? Check Creative Fabrica for pre-made sublimation designs, font duos, and monogram sets that look great on small surfaces.
Safety & Care Notes
- Spray in a well-ventilated area and follow your product’s safety sheet.
- Keep hot tools away from children and pets.
- These are novelty/display items—don’t promise washability or food-contact safety.
- Store unused sprayed sheets in a clean folder to avoid dust and lint.
Optional Variations (Beyond Spray)
While sublimate spray is the star here, advanced crafters sometimes experiment with:
- Poly HTV base: Press a small rectangle of clear or white poly HTV onto the sheet, then sublimate onto the HTV.
- Lamination film: A tiny piece of thermal lamination sheet can act as a polyester layer (very light time/temp to bond, then sublimate).
- Patch & Wrap: Sublimate onto poly fabric scraps, then tape or gently glue the patch to the TP for a dimensional look.
Each method changes the texture, so test a small area first.
Quick Press Settings Cheat Sheet
- Temp: 365–375°F (185–190°C)
- Time: 30–45 seconds
- Pressure: Light–medium
- Coating: 1–2 very light coats of sublimate spray, fully dry
- Protection: Fresh butcher paper above/below every press
Start conservative. If colors look dull, bump time by 5–10 seconds before cranking the heat.
FAQs
Can I run a whole roll through the press?
No—pressing one flat face sheet at a time gives the best control and prevents heat damage to the roll.
Will the paper feel stiff?
The sprayed sheet may feel slightly stiffer than untreated tissue. That’s normal for a novelty display item.
Could I use an iron or EasyPress?
You can try a small press, but uniform pressure and heat are harder to maintain. A traditional heat press is the most reliable.
Do I need two coats of sublimate spray?
Not always. Many brands perform well with one very light coat. If your colors are muted after testing, add a second light coat.
What fonts look best?
Thick, high-contrast fonts with clean edges. Try bold serifs or rounded sans fonts. Explore bundles on Creative Fabrica
Wrap-Up
Sublimating on toilet paper is the perfect mix of silly and skillful—great for gift baskets, shop displays, and social content that gets people talking. With sublimate spray doing the heavy lifting, you’ll get sharper lines, stronger color, and far fewer trial-and-error hiccups. It’s an affordable, creative project that brings laughter, charm, and unforgettable handmade appeal.
If you need ready-to-go artwork, fonts, and bundles to jump-start your designs, check out Creative Fabrica amongest many places that have Free SVG Designs. If you are feeling brave why not try to design your own?
Download this file then check it's Cricut-ready with SVG Doctor before you cut — it scans for stray nodes, layer issues, and anything that might cause problems in Design Space.
Check My SVG Free →