Not sure what’s causing your SVG problem yet? Start with our SVG Doctor tool — it scans your file and tells you exactly what needs fixing before you open Inkscape.
Learn more about How to Fix SVG Files for Cricut — 7 Common Problems
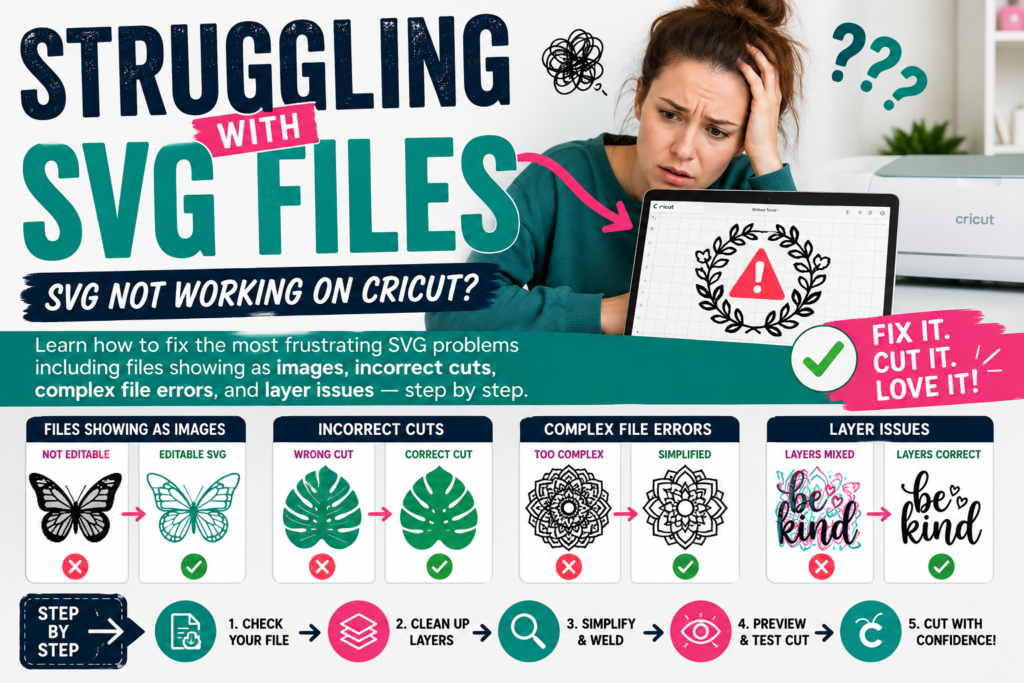
Why SVG Not Working on Cricut Cause So Much Frustration (And How to Fix Them Fast)
You found the perfect design. You downloaded the SVG file. You opened Cricut Design Space — and then something went wrong. Either the cut lines are completely off, the file showed up as a flat image you can’t cut, the layers exploded into a scrambled mess, or Design Space threw up an error message you’ve never seen before.
You’re not alone. SVG problems on Cricut are one of the most common pain points for crafters, especially beginners. But here’s what most troubleshooting guides miss: the reason these problems happen matters just as much as the fix. When you understand why an SVG behaves the way it does in Design Space, you stop guessing and start solving.
This guide walks through the seven most common SVG problems Cricut users encounter, explains the root cause of each one, and gives you a clear, step-by-step path to fix it. Bookmark this page — you’ll want to come back to it.
New to uploading SVG files? Before diving into troubleshooting, make sure you’re familiar with how to correctly upload SVG files to Cricut Design Space — many problems start at the upload step.
Problem 1: SVG Not Cutting Correctly on Cricut
What Causes Incorrect SVG Cuts on Cricut
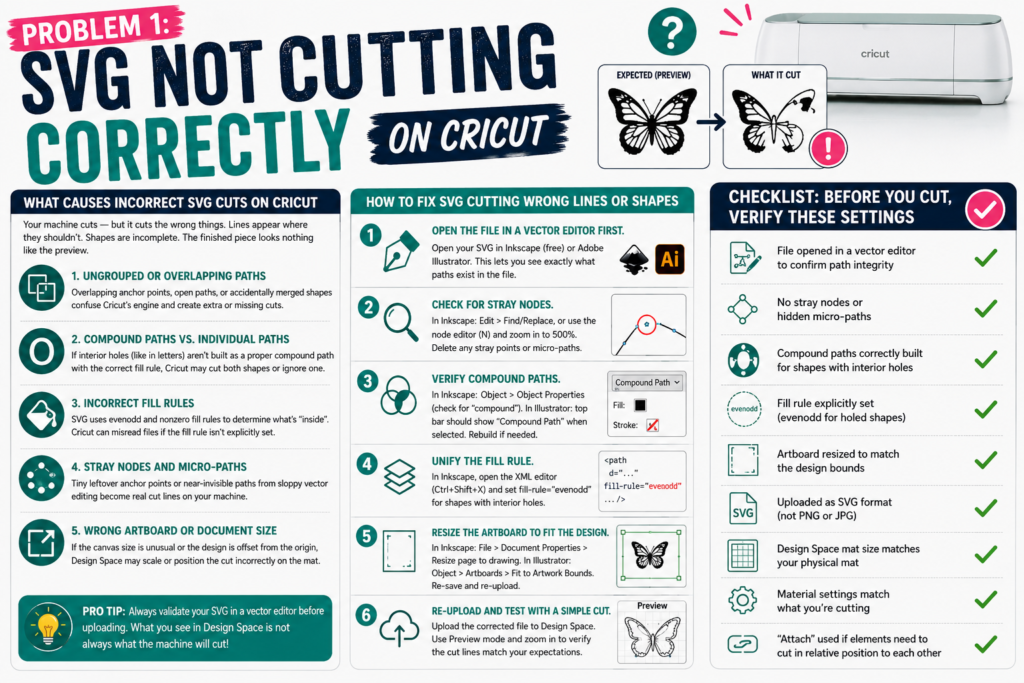
This is arguably the most disorienting problem a Cricut user can face. Your machine cuts — but it cuts the wrong things. Lines appear where they shouldn’t. Shapes are incomplete. The finished piece looks nothing like the preview.
There are several distinct causes:
Ungrouped or overlapping paths. SVG files are built from vector paths. If a designer left overlapping anchor points, open paths, or accidentally merged shapes, Cricut’s engine will interpret them differently than your design software does. What looks correct in Inkscape or Illustrator can behave unpredictably in Design Space.
Compound paths vs. individual paths. A compound path is a single SVG object made of multiple sub-paths. Cricut handles compound paths differently depending on how they’re constructed. If a letter like “O” isn’t built as a proper compound path — the inner hole and outer ring as one object with the correct fill rule — Cricut may cut both the outer shape and the interior as separate elements, or ignore one entirely.
Incorrect fill rules. SVG uses two fill rules: evenodd and nonzero. These control how the software decides which areas are “inside” a shape. Cricut Design Space can misread files where the fill rule hasn’t been explicitly set, causing unexpected cut areas.
Stray nodes and micro-paths. Small leftover anchor points or near-invisible paths from sloppy vector editing are invisible at normal zoom but become full cut lines on your machine. This is especially common in SVGs converted from raster images using auto-trace tools.
Wrong artboard or document size. If the SVG’s document canvas is set to an unusual size or the design is placed offset from the origin point, Design Space may scale or position the cut incorrectly relative to your mat.
How to Fix SVG Cutting Wrong Lines or Shapes
Step 1 — Open the file in a vector editor first.
Before uploading to Design Space, open your SVG in Inkscape (free) or Adobe Illustrator. This lets you see exactly what paths exist in the file, rather than relying on the Design Space preview.
Step 2 — Check for stray nodes.
In Inkscape: Edit > Find/Replace, or use the node editor (N key) and zoom in to 500% across the canvas. Delete any stray single points or micro-paths that don’t belong.
In Illustrator: Object > Path > Clean Up. Check all three boxes (stray points, unpainted objects, empty text frames) and click OK.
Step 3 — Verify compound paths.
Select shapes that should have interior cutouts (letters, geometric windows, etc.). In Inkscape: Object > Object Properties will show whether it’s a compound path. In Illustrator: if it shows as “Compound Path” in the top bar when selected, it’s correct. If it shows as a “Group,” you may need to release it and rebuild it as a true compound path.
Step 4 — Unify the fill rule.
In Inkscape, open the XML editor (Ctrl+Shift+X) and check the fill-rule attribute on problem paths. Set it to evenodd for shapes with interior holes.
Step 5 — Resize the artboard to fit the design.
In Inkscape: File > Document Properties > Resize page to drawing. In Illustrator: Object > Artboards > Fit to Artwork Bounds. Re-save and re-upload.
Step 6 — Re-upload and test with a simple cut.
Upload the corrected file to Design Space. Before cutting on material, use the “Preview” mode and zoom in to verify the cut lines match your expectations.
Checklist: Before You Cut, Verify These Settings
Use this quick checklist every time you’re working with a new SVG file:
- File opened in a vector editor to confirm path integrity
- No stray nodes or hidden micro-paths
- Compound paths correctly built for shapes with interior holes
- Fill rule explicitly set (
evenoddfor holed shapes) - Artboard resized to match the design bounds
- Uploaded as SVG format (not PNG or JPG)
- Design Space mat size matches your physical mat
- Material settings match what you’re cutting
- “Attach” used if elements need to cut in relative position to each other
Problem 2: SVG Shows as an Image Instead of a Cut File in Cricut Design Space
Why Cricut Treats Your SVG Like a JPEG
This one confuses beginners constantly. You upload what you know is an SVG file, but Design Space displays it as a flat, uneditable image — just like a photo. You can’t separate the layers, can’t select individual elements, and the only option seems to be printing it rather than cutting it.
Here’s the real reason this happens: Design Space has two completely separate upload workflows, and which one you choose at the upload screen determines everything.
When you upload a file, Design Space asks whether it’s a “Cut Image” or a “Print Then Cut Image.” If you select the wrong one — or if Design Space defaults to the wrong mode based on how it reads your file — your SVG gets flattened into a raster image for printing, stripping away all the vector cut data.
A secondary cause: the file isn’t actually an SVG. Some websites label files as “SVG” in the product listing but deliver a ZIP containing a PNG or PDF with an .svg extension added. Always open the file in a text editor or vector program first to confirm it contains proper SVG markup.
A third cause: the SVG contains embedded raster images. If a designer embedded a JPEG or PNG inside the SVG container, Design Space will treat the visible content as a flat image rather than cut paths.
Step-by-Step Fix for SVG Displaying as a Flat Image
Step 1 — Confirm the file is a real SVG.
Right-click the file on your computer and open it with Notepad (Windows) or TextEdit (Mac, set to plain text mode). The first line should read something like:
<?xml version="1.0" encoding="UTF-8"?>
<svg xmlns="http://www.w3.org/2000/svg" ...>
If you see binary gibberish or it opens as a JPEG, the file is not a true SVG. You’ll need to source a proper vector version.
Step 2 — Delete the uploaded version in Design Space.
Go to Upload > Uploaded Images, find the file, and delete it. Do not simply try to “re-upload” over it — Design Space caches the incorrect version.
Step 3 — Re-upload with the correct file type selection.
Click Upload > Upload Image > Browse. Select your SVG file. On the next screen, choose “Cut Image” — not “Print Then Cut.”
Step 4 — Check for embedded raster content.
If the file still displays as flat, open it in Inkscape and look at the XML editor. If you see <image tags, the SVG contains an embedded raster. You’ll need to re-trace the design as a vector (Object > Trace Bitmap in Inkscape) or find a clean vector version.
How to Correctly Upload an SVG vs. a Print Image in Design Space
The distinction is simple but critical:
| Upload Type | Use When | Result in Design Space |
|---|---|---|
| Cut Image | File is a true SVG with vector paths | Editable layers, cuttable paths, color separation |
| Print Then Cut | File is a JPEG, PNG, or decorative image meant to be printed and then cut around | Flat image with a bounding cut line only |
| Basic Cut | Simple single-color SVG for cutting only | Single-layer cut shape |
When in doubt, upload as Cut Image. If Design Space gives you an error or displays it incorrectly, investigate the file structure using the steps above.
Problem 3: Cricut SVG Layers Problem — Ungrouping, Misaligned, or Missing Layers
Understanding How SVG Layers Work in Design Space
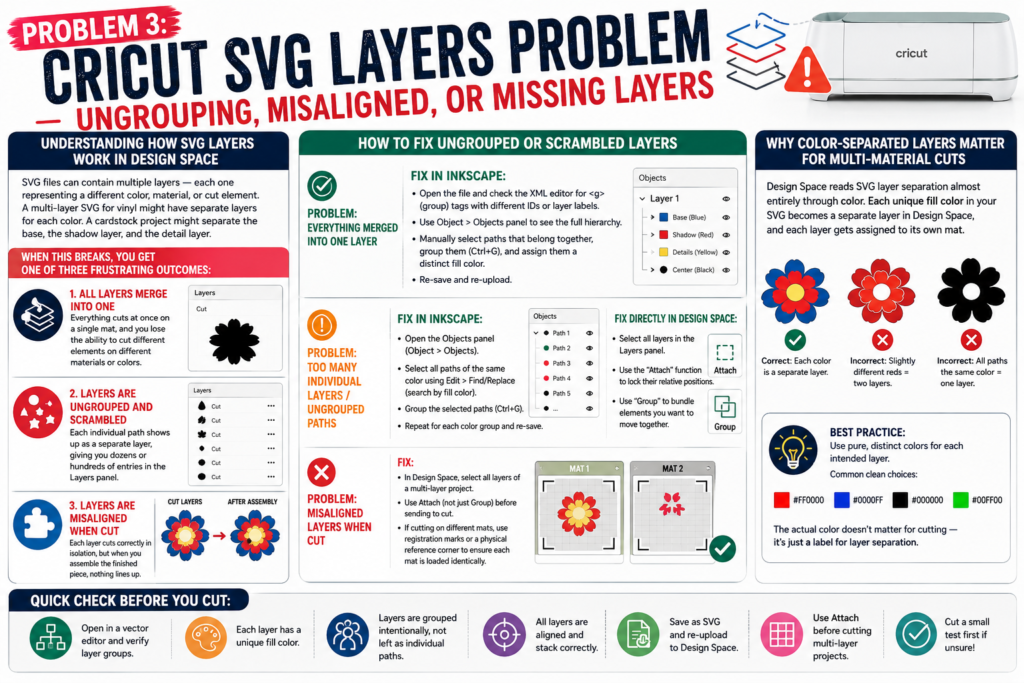
One of the most powerful things about SVG files is that they can contain multiple layers — each one representing a different color, material, or cut element. A multi-layer SVG for a vinyl project might have separate layers for each color of vinyl. A cardstock project might separate the base, the shadow layer, and the detail layer.
When this breaks, you get one of three frustrating outcomes:
- All layers merge into one. Everything cuts at once on a single mat, and you lose the ability to cut different elements on different materials or colors.
- Layers are ungrouped and scrambled. Each individual path shows up as a separate layer, giving you dozens or hundreds of entries in the Layers panel.
- Layers are misaligned when cut. Each layer cuts correctly in isolation, but when you assemble the finished piece, nothing lines up.
How to Fix Ungrouped or Scrambled Layers
Problem: Everything merged into one layer
This usually means the SVG wasn’t properly built with separate groups or the layers were flattened before export. Fix in Inkscape:
- Open the file and check the XML editor for
<g>(group) tags with different IDs or layer labels. - Use Object > Objects panel to see the full hierarchy.
- Manually select paths that belong together, group them (Ctrl+G), and assign them a distinct fill color.
- Re-save and re-upload.
Problem: Too many individual layers / ungrouped paths
Fix in Inkscape:
- Open the Objects panel (Object > Objects).
- Select all paths of the same color using Edit > Find/Replace (search by fill color).
- Group the selected paths (Ctrl+G).
- Repeat for each color group and re-save.
Fix directly in Design Space:
- Select all layers in the Layers panel.
- Use the “Attach” function to lock their relative positions.
- Use “Group” to bundle elements you want to move together.
Problem: Misaligned layers when cut
- In Design Space, select all layers of a multi-layer project.
- Use Attach (not just Group) before sending to cut.
- If cutting on different mats, use registration marks or a physical reference corner to ensure each mat is loaded identically.
Why Color-Separated Layers Matter for Multi-Material Cuts
Design Space reads SVG layer separation almost entirely through color. Each unique fill color in your SVG becomes a separate layer in Design Space, and each layer gets assigned to its own mat.
This means if your red and your dark red are slightly different hex values, Design Space treats them as two different layers — even if you intended them as one. If all paths share the same color, Design Space collapses them into one layer regardless of how they’re structured in Inkscape.
Best practice: Use pure, distinct colors for each intended layer. Common clean choices: #FF0000 (red), #0000FF (blue), #000000 (black), #00FF00 (green). The actual color doesn’t matter for cutting — it’s just a grouping signal.
Problem 4: SVG File Too Complex for Cricut — What It Means and How to Simplify It
What Makes an SVG Too Complex for Cricut to Process
Cricut Design Space isn’t a full vector editor. It has limits on how much path data it can process. When you upload a file that exceeds those limits, you’ll typically see one of these:
- A “file too complex” error message on upload
- Design Space freezing or crashing when you try to manipulate the file
- Extremely slow rendering, where the canvas takes minutes to update
- A cut that starts and then stops mid-project
The complexity usually comes from one of these sources:
Auto-traced raster images. When someone converts a photograph or detailed illustration into SVG using auto-trace, the result can contain thousands of individual paths. A simple cartoon converted from a PNG might look like 5 shapes but actually contain 4,000 nodes.
Highly detailed illustrations. Intricate mandala designs, realistic portrait cuts, and complex floral patterns can contain path counts that overwhelm Design Space.
Fonts converted to outlines with excessive nodes. When script or handwritten fonts are converted to paths, each letter can carry hundreds of unnecessary anchor points.
Nested groups and transforms. Files with deeply nested SVG groups and multiple transform matrices stack up processing overhead quickly.
How to Simplify SVG Paths in Inkscape or Adobe Illustrator (Free and Paid Options)
Using Inkscape (Free)
Method 1 — Simplify paths
- Open the SVG in Inkscape.
- Select all (Ctrl+A).
- Go to Path > Simplify (Ctrl+L).
- Inkscape will reduce the node count while preserving the visual shape. Apply multiple times for more aggressive simplification.
- Watch the node count in the status bar — aim to get below 1,000 total nodes for reliable Design Space performance.
Method 2 — Remove unnecessary detail layers
- Open the XML editor and look for
<g>groups withdisplay:noneor very small paths (under 0.5mm). - Delete any hidden or irrelevant groups.
Method 3 — Merge overlapping paths
- Select all paths of the same color.
- Path > Union. This merges them into a single path, drastically reducing complexity.
- Warning: Union is destructive. Save a backup first.
Using Adobe Illustrator (Paid)
Method 1 — Simplify path
- Select all.
- Object > Path > Simplify.
- Adjust the “Curve Precision” slider. Lower values simplify more aggressively. Preview is shown in real time.
- Also check “Straight Lines” for geometric designs to eliminate curved approximations of straight edges.
Method 2 — Pathfinder merge
- Select overlapping paths.
- Window > Pathfinder.
- Click “Unite” to merge them into a single compound shape.
Method 3 — Clean Up action
Object > Path > Clean Up removes stray points and empty paths without touching your design.
When to Contact the File Designer vs. Fix It Yourself
Fix it yourself if:
- The problem is stray nodes or minor path clutter
- You’re comfortable with Inkscape or Illustrator
- The file is from a free resource and support isn’t available
- The simplification needed is minor (a few hundred extra nodes)
Contact the designer if:
- The file is fundamentally broken (wrong paths, missing elements, incorrect compound path construction)
- You paid for the file and it doesn’t perform as advertised
- The complexity is so extreme that simplification would visually alter the design
- The file contains embedded rasters masquerading as cut paths
Problem 5: SVG File Uploads but Won’t Cut — Blank Mat or No Cut Lines
This problem has a specific cause that trips up a lot of beginners: the SVG contains only stroke paths with no fill, and Design Space reads fill-based cut lines.
By default, Cricut Design Space reads filled vector areas as cut regions. Paths that are stroke-only (an outline with no fill color) may not register as cut lines at all, resulting in a blank mat despite a successful upload.
Fix: Open the file in Inkscape. Select all paths. In the Fill and Stroke panel (Shift+Ctrl+F), check whether paths have a Fill or only a Stroke. If they’re stroke-only, apply a fill color (any solid color) to each path group and remove the stroke.
Alternatively, in Inkscape: select stroke-only paths, then go to Path > Stroke to Path. This converts the visible stroke into a filled shape that Design Space can read as a cut line.
Problem 6: SVG Cuts Way Too Small or Too Large in Design Space
SVG files don’t have a fixed physical size the way a JPEG does. The dimensions are defined by the document’s viewBox attribute and any width/height values in the SVG markup — and if these are set inconsistently, Design Space will scale the design to something unexpected.
Common causes include: the SVG was saved with dimensions in pixels but no DPI reference; the artboard is much larger than the design (causing the visible design to appear tiny within it); or the design was built in millimeters but exported without a proper unit declaration.
Fix:
- Open in Inkscape.
- Go to File > Document Properties. Check the document size and units.
- Resize the page to the drawing (there’s a button for this in Document Properties).
- Set the document units to millimeters or inches explicitly.
- Re-save and re-upload.
In Design Space, you can also manually type exact dimensions in the W and H fields at the top of the canvas after uploading — but fixing the source file is always preferable for repeatability.
Problem 7: SVG Works in Design Space but Cuts Messily on the Machine
Sometimes your SVG is perfectly built and Design Space shows a perfect preview — but the physical cut is messy. Incomplete cuts, ragged edges, or the machine losing its place mid-cut are machine and settings issues, not SVG issues.
Check these first:
- Blade depth. A blade set too shallow won’t cut through material cleanly. Run a test cut before committing to a full project.
- Blade wear. Cricut blades dull over time. A rough, incomplete cut on a material you’ve successfully cut before often means it’s time for a new blade.
- Mat stickiness. If the material shifts during cutting, the paths that looked correct in preview will come out misaligned. Replace your mat or use a brayer to re-adhere material properly.
- Machine calibration. For multi-layer projects especially, run Cricut’s built-in calibration tool (Settings > Calibration in Design Space) to ensure the machine cuts where it thinks it’s cutting.
FAQ: Quick Answers to the Most Searched Cricut SVG Errors
Why does my SVG look different in Design Space than it did when I downloaded it?
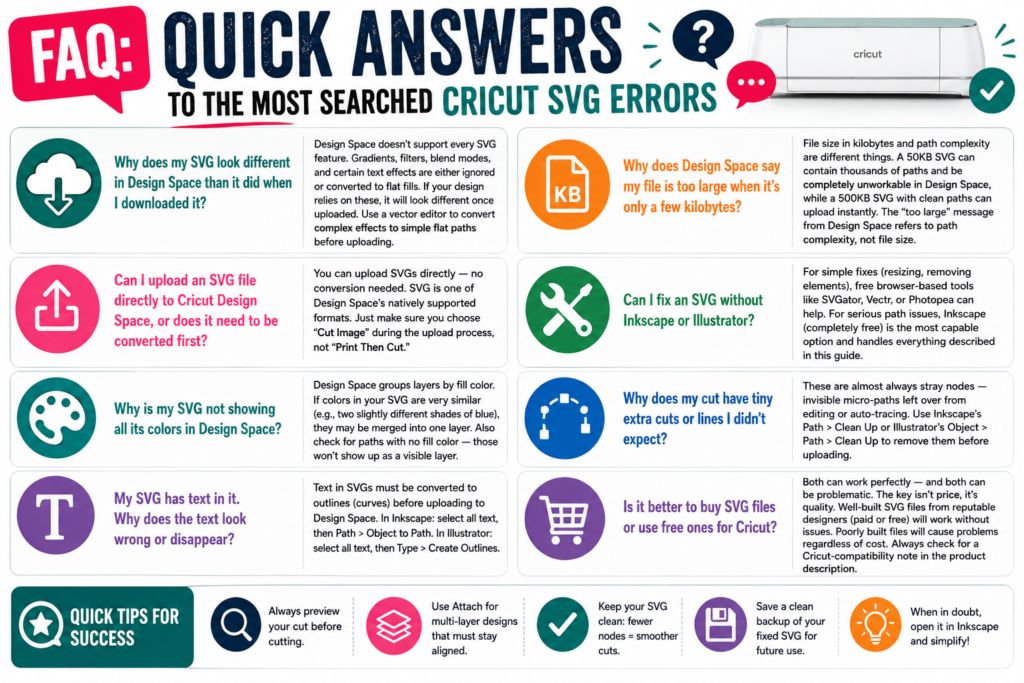
Design Space doesn’t support every SVG feature. Gradients, filters, blend modes, and certain text effects are either ignored or converted to flat fills. If your design relies on these, it will look different once uploaded. Use a vector editor to convert complex effects to simple flat paths before uploading.
Can I upload an SVG file directly to Cricut Design Space, or does it need to be converted first?
You can upload SVGs directly — no conversion needed. SVG is one of Design Space’s natively supported formats. Just make sure you choose “Cut Image” during the upload process, not “Print Then Cut.”
Why is my SVG not showing all its colors in Design Space?
Design Space groups layers by fill color. If colors in your SVG are very similar (e.g., two slightly different shades of blue), they may be merged into one layer. Also check for paths with no fill color — those won’t show up as a visible layer.
My SVG has text in it. Why does the text look wrong or disappear?
Text in SVGs must be converted to outlines (curves) before uploading to Design Space. In Inkscape: select all text, then Path > Object to Path. In Illustrator: select all text, then Type > Create Outlines.
Why does Design Space say my file is too large when it’s only a few kilobytes?
File size in kilobytes and path complexity are different things. A 50KB SVG can contain thousands of paths and be completely unworkable in Design Space, while a 500KB SVG with clean paths can upload instantly. The “too large” message from Design Space refers to path complexity, not file size.
Can I fix an SVG without Inkscape or Illustrator?
For simple fixes (resizing, removing elements), free browser-based tools like SVGator, Vectr, or Photopea can help. For serious path issues, Inkscape (completely free) is the most capable option and handles everything described in this guide.
Why does my cut have tiny extra cuts or lines I didn’t expect?
These are almost always stray nodes — invisible micro-paths left over from editing or auto-tracing. Use Inkscape’s Path > Clean Up or Illustrator’s Object > Path > Clean Up to remove them before uploading.
Is it better to buy SVG files or use free ones for Cricut?
Both can work perfectly — and both can be problematic. The key isn’t price, it’s quality. Well-built SVG files from reputable designers (paid or free) will work without issues. Poorly built files will cause problems regardless of cost. Always check for a Cricut-compatibility note in the product description.
Where to Find Free SVG Files That Actually Work With Cricut
Not all free SVG files are created equal. The internet is full of SVG downloads that were clearly designed for screen display rather than cutting — filled with embedded rasters, stroke-only paths, and node counts that would make Design Space weep.
When sourcing free SVGs for Cricut, look for these quality signals:
“Cricut compatible” or “Design Space tested” labels. Designers who cut their own files know what works. If they mention Cricut in the product description, the file has usually been tested in actual Design Space.
Clean layer separation by color. A preview that shows distinct, clean color blocks (rather than complex gradients or photographic elements) is a good sign the file will import with proper layer separation.
Vector-native file formats. Downloads that include both .svg and .dxf versions are a good sign — the designer is working in actual vector software and understands cutting machine workflows.
Low node count. If a designer mentions “optimized for cutting” or “clean paths,” they’ve done the work to keep complexity manageable.
Avoid: Auto-traced clip art, decorative SVGs ripped from presentation templates, and files where the preview image looks photographic or watercolor. These are almost certainly embedded rasters inside an SVG wrapper.
Final Troubleshooting Checklist
When an SVG isn’t working on your Cricut, work through this list in order before giving up on the file:
- Confirm it’s a real SVG — open in a text editor and verify SVG markup
- Open in Inkscape or Illustrator — see exactly what paths exist
- Run Clean Up — remove stray points, empty paths, and invisible objects
- Check fill vs. stroke — ensure all cut paths have a fill color applied
- Verify compound paths — shapes with holes should be proper compound paths with
fill-rule: evenodd - Simplify if needed — use Path > Simplify to reduce node count
- Resize artboard to fit design — eliminate excess canvas space
- Convert text to outlines — never upload SVGs with live text
- Re-upload as Cut Image — delete the previous upload first, then re-upload
- Use Attach in Design Space — lock relative positions before cutting multi-layer projects
Most SVG problems on Cricut come down to a handful of fixable issues. Once you’ve worked through this list a few times, you’ll develop an instinct for spotting problems at a glance — and you’ll spend a lot less time troubleshooting and a lot more time actually making things.
Got a specific SVG error that isn’t covered here? Drop it in the comments — we update this guide regularly based on the problems readers are actually running into.
Download this file then check it's Cricut-ready with SVG Doctor before you cut — it scans for stray nodes, layer issues, and anything that might cause problems in Design Space.
Check My SVG Free →