Are you ready to conquer the challenge of Cricut blade replacement? Picture this: you, confidently swapping out the old blade for a brand new one. No more frustration, just smooth crafting ahead.
In this article, we’ll walk you through the simple steps of replacing your Cricut blade.
First, you’ll identify the type of blade you have and ensure it’s compatible with your machine.
Then, you’ll open the clamp and carefully remove the blade housing. With a push of a button, the old blade will be history.
Inserting the new blade is a breeze – just remove the protective cap, align it correctly, and let the magnet do its magic.
Finally, drop the blade housing back into the machine clamp, and you’re all set.
Get ready to revolutionize your crafting experience with a fresh Cricut blade!
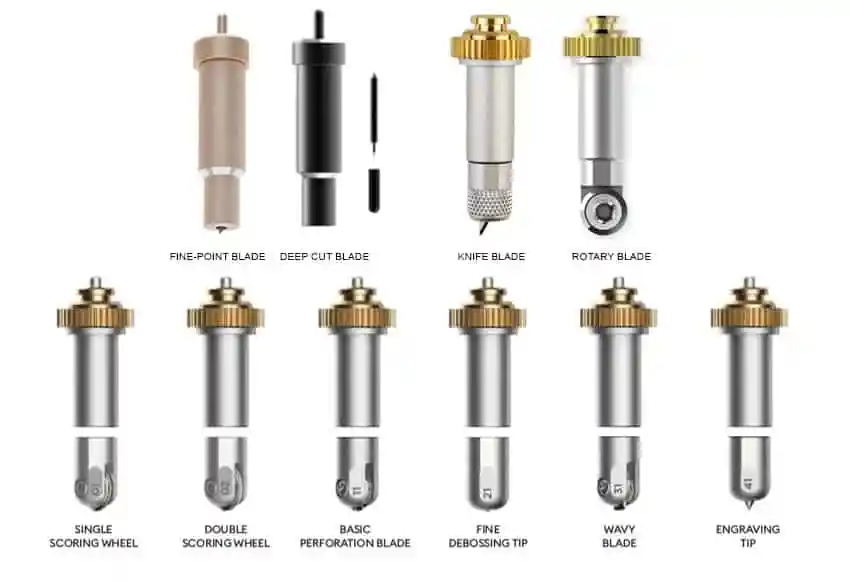
- The most common Cricut Blade Replacement options include the Fine-Point Blade, Deep-Point Blade, and the Rotary Blade.
- The Fine-Point Blade is versatile and suitable for materials like vinyl, cardstock, and iron-on.
- The Deep-Point Blade is designed for thicker materials like leather and chipboard.
- The Rotary Blade is perfect for cutting fabric without fraying the edges.
Identifying the Blade Type
To identify the blade type for your Cricut machine, use the article determiner ‘an’ and state, ‘You can identify the blade type by referring to an All About Cricut Blades and machine tools help article.’ This article provides detailed information on the different types of blades available for Cricut machines.
When it comes to Cricut blades, there are a few options to choose from. The most common ones include the Fine-Point Blade, Deep-Point Blade, and the Rotary Blade. Each blade is designed for specific materials and projects, so it’s important to know which one is suitable for your needs.
The Fine-Point Blade is the standard blade that comes with most Cricut machines. It’s versatile and can be used for a wide range of materials, including vinyl, cardstock, and iron-on.
The Deep-Point Blade, on the other hand, is designed for thicker materials like leather and chipboard. It has a steeper blade angle, allowing it to cut through these materials with ease.
Lastly, the Rotary Blade is perfect for cutting fabric, enabling you to create intricate designs without fraying the edges.
Removing the Old Blade
To remove the old blade from your Cricut machine, follow these steps:
- Open the clamp on your machine.
- Grip the blade housing firmly and pull it straight up in one smooth motion.
- Be cautious not to twist or tilt the housing to avoid dislodging the blade and potential injury.
Once the blade housing is removed, you can proceed to remove the old blade:
- Locate the button on top of the housing.
- Press the button firmly and hold it down.
- Carefully remove the old blade from the housing, making sure not to touch the sharp cutting edge to avoid accidental cuts.
Now that the old blade is removed, you can prepare the new one for installation:
- Remove the clear protective cap from the new blade, being mindful of its sharpness.
- Insert the new blade into the blade housing, ensuring that the thicker end goes in first.
- The magnet inside the housing will hold the blade securely in place.
Finally, it’s time to reassemble the machine:
- Carefully lower the blade housing back into the machine clamp.
- Make sure it’s aligned properly and securely seated.
- Close the clamp to secure the new blade in place.
Now you’re ready to continue creating with your Cricut machine!
Inserting the New Blade
Once you have successfully removed the old blade from your Cricut machine, it’s time to insert the new blade. Start by removing the clear protective cap from the new blade. Make sure to hold the blade by its handle and not the sharp cutting end.
Next, insert the blade into the blade housing with the thicker end going in first. Be careful not to insert the cutting end into the blade housing, as this could cause damage. The blade should fit snugly into the housing.
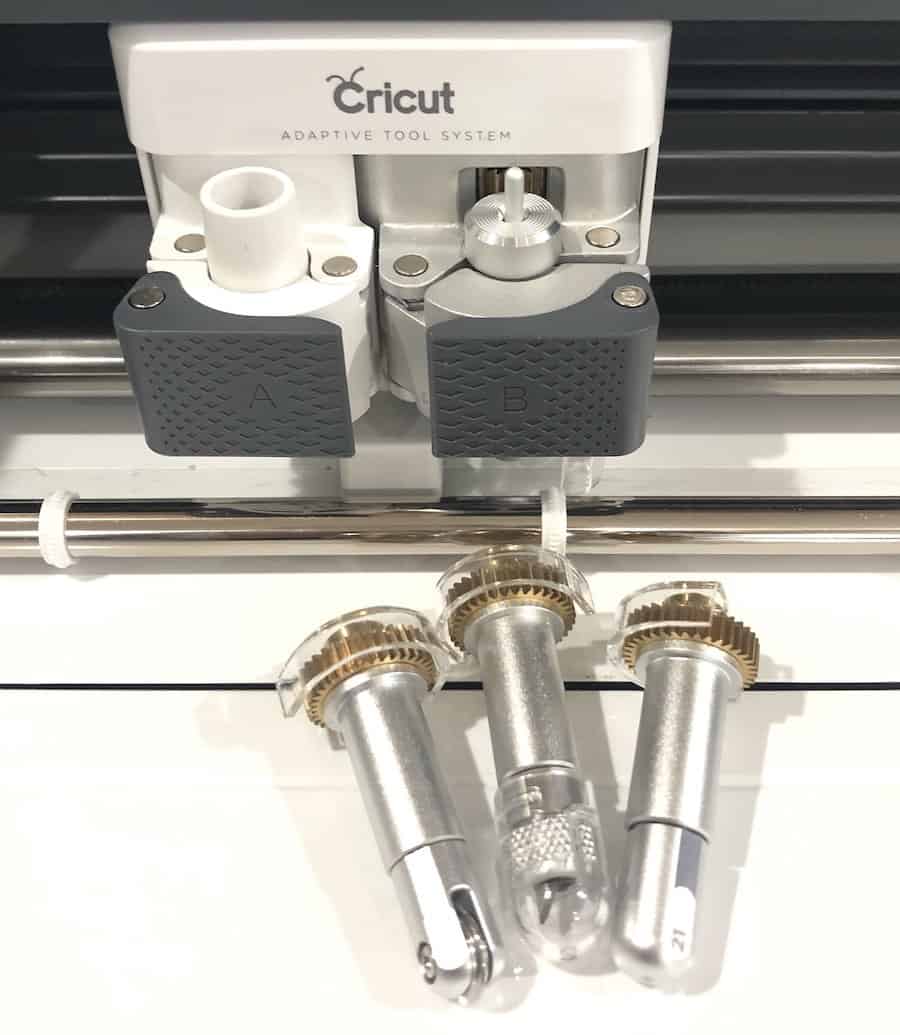
Once the blade is in place, drop the blade housing back into the machine clamp. You’ll notice that a magnet inside the machine will hold the blade housing securely in place. Ensure that the blade housing is properly aligned and seated in the clamp.
If you have a Cricut Quickswap blade, the process is slightly different. Simply push the button at the top of the housing to remove the old blade. Then, align the flat sides of the new blade tip with the flat insides of the housing, push it on, and release the button to secure it in place.
Now that you have successfully inserted the new blade, you’re ready to continue using your Cricut machine for all your creative projects. Happy crafting!
Replacing a Quickswap Blade
To replace a Quickswap blade, first, identify the type of blade you have and ensure compatibility with your Cricut machine. You can refer to the All About Cricut Blades and machine tools help article to find this information.
Once you have identified the blade, open the clamp and pull the blade housing straight up to remove it. Push the button on top of the blade housing and carefully remove the blade. Take the new blade and remove the clear protective cap. Insert the new blade into the blade housing, making sure to insert the thicker end first and not the cutting end. The blade will be held in place by a magnet.
Drop the blade housing back into the machine clamp.
If you have a Cricut Quickswap blade, replacing it’s even easier. Simply push the button at the top of the housing to pop the old blade off. Align the flat sides of the new blade tip with the flat insides of the housing and push it on. Release the button and your Quickswap blade is ready to use.
Read on to learn more about Cricut Blade Replacement.
Securing the Blade in the Machine Clamp
To secure the blade in the machine clamp, you’ll need to carefully drop the blade housing back into place. Here are the steps to follow:
- Make sure the blade housing is aligned properly with the machine clamp before dropping it in.
- Gently lower the blade housing into the clamp, ensuring that it fits snugly.
- Double-check that the blade is properly seated in the housing and securely held in place by the magnet.
- Ensure that the blade isn’t wobbly or loose in the clamp.
- Once the blade housing is securely in place, close the clamp to hold it firmly.
By following these steps, you can ensure that the blade is securely fastened in the machine clamp. This is important for achieving accurate and precise cuts with your Cricut machine.
Always make sure to double-check the blade’s position and ensure that it’s properly seated before starting any cutting projects.
Frequently Asked Questions About Cricut Blade Replacement
How Often Should I Replace My Cricut Blade?
You should replace your Cricut blade when it starts to become dull or when you notice that it’s not cutting as well as it used to. Regularly inspect the blade for any signs of wear or damage.
If you’re using your Cricut frequently or cutting materials that are more abrasive, you may need to replace the blade more often. It’s important to keep your blade sharp to ensure clean and precise cuts.
Can I Use Any Brand of Replacement Blades for My Cricut Machine?
No, you can’t use any brand of replacement blades for your Cricut machine. It’s important to use blades that are specifically designed for your Cricut machine to ensure optimal performance and compatibility.
Using blades from other brands may result in damage to your machine or poor cutting quality.
Always refer to the manufacturer’s guidelines and use genuine Cricut blades for the best results.
Are There Any Special Instructions for Cleaning the Blade Before Replacing It?
Before replacing the blade, it’s important to clean it properly to ensure optimal performance.
Start by unplugging your Cricut machine and removing the blade housing.
Take a soft cloth or cotton swab and gently wipe away any debris or residue from the blade.
Avoid using any harsh chemicals or abrasive materials that could damage the blade.
Once it’s clean, you can follow the steps mentioned earlier to replace the blade and continue crafting with your Cricut machine.
What Should I Do if the Blade Is Not Cutting Properly After Replacement?
If the blade isn’t cutting properly after replacement, there are a few things you can try.
First, make sure the blade is inserted correctly and securely in the blade housing.
Check if the blade needs to be adjusted or replaced if it’s damaged or worn out.
Additionally, double-check that you’re using the correct settings and materials for your project.
If the issue persists, it may be helpful to contact Cricut customer support for further assistance.
Can I Reuse the Clear Protective Cap From the Old Blade on the New One?
No, you shouldn’t reuse the clear protective cap from the old blade on the new one.
It’s important to use a new cap to ensure proper protection for the blade.
Reusing the old cap can lead to issues with cutting and potentially damage the blade or your Cricut machine.
Always use a fresh, unused clear protective cap when replacing your Cricut blade for optimal performance.
Cricut Blade Replacement Round up
Replacing your Cricut blade is a simple and straightforward process. By following the steps outlined in this article, you can easily identify the blade type, remove the old blade, insert the new one, and secure it in the machine clamp.
Remember, ‘Practice makes perfect,’ so don’t be discouraged if it takes a few tries to get the hang of it. With a little patience and practice, you’ll be able to replace your Cricut blade with ease.


