Cricut Size Guide + Cheat Sheet for (Mugs, Tees, Totes & Signs) + Free “Size Test” SVG
If you’ve ever cut a design that looked perfect on your screen but felt too small (or way too big) on the actual blank, you’re not alone. Getting sizing right is one of the biggest differences between a “meh” project and a polished, gift-ready piece. This guide is your one-stop sizing reference for popular blanks—mugs, t-shirts, totes, and wooden signs—plus a free “Size Test” SVG you can cut first to avoid wasting vinyl or HTV. We’ll also share fast measuring tricks, placement tips, and simple ways to upload SVG Files to Cricut Design Space and scale them with confidence.
Why Sizing Matters (More Than You Think)
- Readability: Script letters and thin strokes vanish when they’re undersized, while chunky shapes can overwhelm small blanks.
- Comfort & Wearability: T-shirt designs that are too wide creep into the armpit or wrap around the ribcage.
- Material Waste: A single mis-sized cut can cost more in vinyl than the time it takes to test first.
- Professional Finish: Balanced margins (left/right/top/bottom) trick the eye into seeing “centered” and “intentional.”
Treat sizing as part of your design—not an afterthought.
How to Measure Any Blank (Fast)
- Find the “printable” area.
Ignore curves, seams, and handles. On mugs, measure the flat-ish band you’ll actually apply to. On tees and totes, measure the front chest rectangle where a design sits naturally. - Use safe margins.
Leave a little breathing room (⅜–½ in) from edges or seams so the design doesn’t look cramped. - Consider curvature and stretch.
Curved mugs make very tall designs look distorted. Stretchy shirts (especially baby onesies) shrink a design visually when worn—err slightly larger vertically. - Test with paper.
Print a quick paper rectangle at your target dimensions or cut the free “Size Test” strips below, tape them on the blank, and step back.
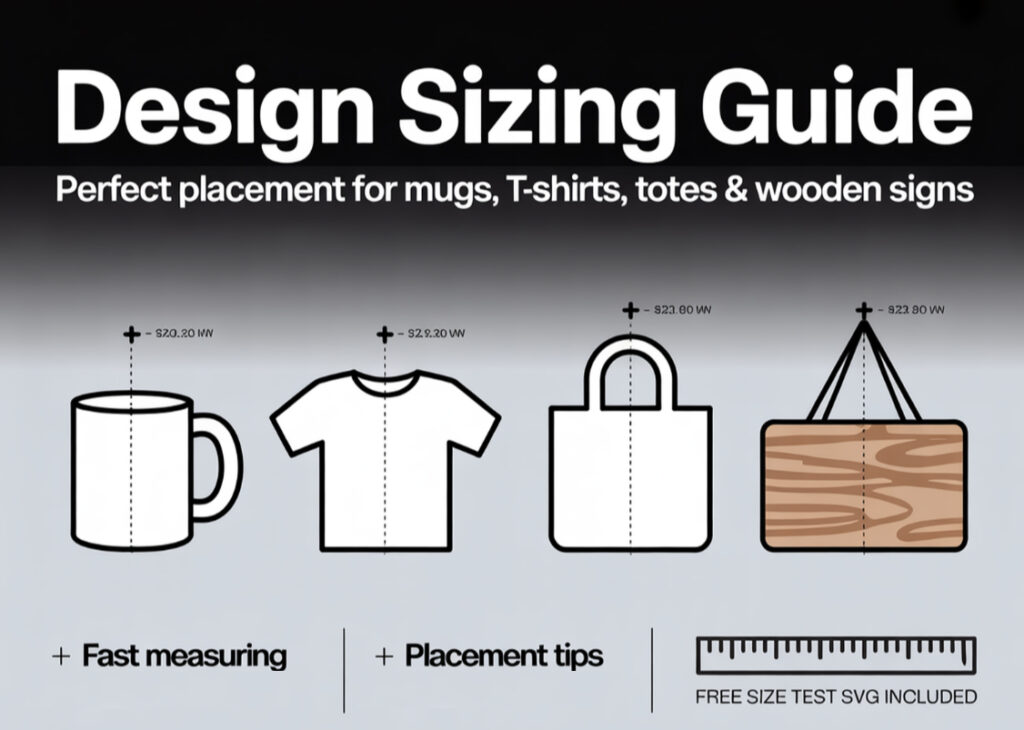
Quick Size Charts (Copy & Keep)
These are starting ranges. Every font, design style, and blank differs. Test, then nudge up or down by 0.25–0.5 in.
Mugs
- 11 oz mug: Width 3–3.5 in, Height 2.5–3 in (single decal)
- 15 oz mug: Width 3.5–4 in, Height 3–3.5 in (single decal)
- Mug wrap (text/graphics around): Keep main elements under 7–8 in wide for readability unless you’re doing a full wrap.
Tip: For small logos or icons on the “sip side,” go 2–2.5 in wide.
Tumblers (quick reference)
- Skinny 20 oz: Single badge 2.5–3.25 in wide.
- Wraps: Follow your tumbler’s exact template; for decals, avoid super-tall graphics that have to bend.
T-Shirts (Front Chest)
- Toddler (2T–4T): 6–7 in wide
- Youth (XS–M): 7–8.5 in wide
- Youth (L–XL): 8.5–9.5 in wide
- Adult S–M: 9–10 in wide
- Adult L–XL: 10–11 in wide
- Adult 2XL+: 11–12 in wide
Back prints: Add 0.5–1 in to the width over your front-chest choice.
Left chest logo: 3–4 in wide, placed 3–3.5 in down from the collar, 4 in from the center line.
Onesies
- Newborn: 3.5–4.5 in wide
- 0–3 months: 4–4.5 in wide
- 6–9 months: 4.5–5 in wide
- 12 months: 5–5.5 in wide
Hoodies & Sweatshirts
- Front center: 9.5–11.5 in wide (size up 0.5 in vs tees)
- Above pocket (hoodie): Go slightly shorter (8.5–10 in) so the design doesn’t run into the top seam of the pouch.
Tote Bags
- Standard canvas tote: 8–10 in wide for a neat, centered look
- Oversized tote: 10–12 in wide
Tip: Totebags often look best with designs that leave 1–1.5 in margin on each side.
Wood & Home Signs
- 8 × 10 in sign: 6–7 in wide
- 10 × 10 in sign: 7.5–9 in wide
- 12 × 12 in sign: 9–10.5 in wide
- 12 × 24 in sign: 18–20 in wide (landscape layouts love multi-line text)
Margin rule of thumb: Leave 0.75–1.25 in margin on small signs, 1.5–2 in on larger boards.
Fonts, Lines & Readability (Don’t Skip)
- Script fonts: If your script is delicate, size up by 0.25–0.75 in over the chart. Skinny strokes weed poorly at tiny sizes.
- All-caps: All-caps designs look louder; they can run 0.25–0.5 in smaller and still read.
- Two-line quotes: Keep line widths similar; nudge tracking/line spacing so the block feels balanced.
- Icons vs. text: When paired, let text lead width and scale the icon to complement, not compete.
HTV vs Adhesive Vinyl (Sizing & Setup)
- HTV (heat transfer vinyl): Mirror your design before cutting. On garments, wider looks better than taller; tall designs invade the belly area.
- Adhesive vinyl (mugs, jars, signs): Do not mirror. For curved items (mugs), avoid very tall designs that need to bend; tall + narrow = wrinkles.
- Material thickness matters: Glitter and flock HTV are thicker; overly small details may not transfer cleanly—size up slightly.
Upload & Scale with Confidence in Cricut Design Space
You can upload SVG Files to Cricut Design Space in seconds:
- Click Upload → Upload Image → select your .svg.
- Choose Add to Canvas.
- With the design selected, check the lock icon (keep aspect ratio).
- Type your target Width (e.g., 3.25 in for an 11 oz mug decal) and press Enter.
- Position as needed, then Make It.
Common gotcha: If an SVG imports very large or very tiny, don’t panic—SVGs are vector. Just set width numerically. That’s it.
Placement Cheats (So It Looks “Right”)
- Front center on tees: 3–3.5 in down from the collar for adults, 2–2.5 in for kids.
- Left chest on tees: Start 3 in down, 4 in from center.
- Mugs: Center the decal between handle and “front” (for right-handers, place the design so it faces outward while sipping).
- Totes: Visually center the design but bias 0.25–0.5 in upward—bags sag and can make centered designs look low.
Your Free “Size Test” SVG (How to Use It)
Before cutting the real design, cut a quick strip that matches your planned width. Tape it to your blank and step back from arm’s length. If it looks off, you’ll know whether to go up or down by 0.25–0.5 in.
What’s inside the test file
- Horizontal bars labeled 3 in, 3.5 in, 8 in, 10 in, 12 in
- Clean, single-stroke labels for easy weeding
- Separate layers so you can cut only the sizes you need
Note: Most browsers and Cricut Design Space assume ~96 pixels = 1 inch. That’s why 3 in ≈ 288 px, 10 in ≈ 960 px, etc. If your bars import slightly off, just select a bar and set the Width numerically in Design Space.
Troubleshooting: When Sizing Goes Sideways
“My SVG imports huge/tiny.”
That’s normal across design apps. Set the Width (or Height) numerically while the lock icon is enabled.
“The decal wrinkles on my mug.”
Your design might be too tall for the curve. Try a shorter, wider layout; keep height under 2.75–3 in for 11 oz mugs.
“Letters weeded off.”
Go bigger (0.25–0.5 in), choose a thicker font, or increase stroke weight in your design app before exporting.
“Print Then Cut is clipping my design.”
Cricut’s Print Then Cut has a max printable area (commonly 6.75 × 9.25 in). Keep printed graphics under that footprint or slice into panels.
“My t-shirt looks off-center.”
Check collar skew (some collars tilt). Use a fold crease or center ruler. Sometimes “visually centered” beats mathematically centered.
Real-World Examples (Use These as Starting Points)
- 11 oz coffee mug with quote
- Width: 3.25 in
- Height: Usually ≤ 3 in
- Material: Permanent adhesive vinyl (matte reads premium, glossy pops)
- Adult M tee (front chest)
- Width: 9.5–10 in
- HTV: Mirror before cutting; press according to vinyl brand, warm or cool peel as specified
- Standard tote
- Width: 9 in
- Keep at least 1 in margin from left/right seam
- 12 × 12 in farmhouse sign
- Width: 9.5–10.5 in
- Multi-line text: balance line widths, keep generous margins for a gallery feel
Speed Workflow: From SVG to Finished Cut
- Download the SVG (or create your own).
- Upload SVG Files to Cricut Design Space (Upload → Upload Image → select SVG → Add to Canvas).
- Set the width based on the chart above (lock on).
- Attach/Weld if the design has parts that must cut together.
- Mirror if using HTV.
- Test cut a small shape (triangle or circle) to check blade/material settings.
- Weed & apply using transfer tape (adhesive vinyl) or a heat press (HTV), following brand-specific temps and times.
Pro Tips That Save You Vinyl (and Headaches)
- Design once, export twice: Save a “tee version” and a “mug version” at your proven sizes. Future you will thank you.
- Keep a pocket notebook (or phone note): Record your best-looking widths for each blank you use often.
- Grid & templates: In Design Space, drop in rectangles sized to your blanks (e.g., 9 × 9 in tote area). Scale designs inside that rectangle, then hide/delete the rectangle before cutting.
- Contrast is king: If it’s hard to read, it’s probably low contrast (cream on beige, silver on gray). No amount of sizing rescues low contrast.
Download the Free “Size Test” SVG & Start Crafting
Whether you’re sizing for mugs, tees, totes, or signs, a quick bar test beats guesswork. Cut the width you think you want, tape it to the blank, and step back. Adjust by ¼–½ in until it looks perfect, then cut the real design.
When you publish your next free SVG on your site (or grab one from ours), add a little line like:
“For 11 oz mugs, try 3–3.5 in wide; for adult tees, 9–11 in wide. Need help sizing? See our Cricut Sizing Cheat Sheet and cut the free ‘Size Test’ SVG first.”
This tiny tip reduces support messages and gives beginners instant confidence.
Final Word
Sizing isn’t scary—it’s a habit. Measure, test with the Size Test bars, and set numeric widths in Design Space. In a couple of projects you’ll have a personal cheat sheet that you trust. And when in doubt, favor readability and margins over cramming “just a bit more” into the space. That restraint is exactly what makes handmade projects look professional.
Ready to try it? Upload SVG Files to Cricut Design Space, set your width from the chart, and cut the test bar before the real thing. You’ll save material, time, and—most importantly—your sanity. Happy crafting!
Download this file then check it's Cricut-ready with SVG Doctor before you cut — it scans for stray nodes, layer issues, and anything that might cause problems in Design Space.
Check My SVG Free →